
Introduction
Deploying a robust and scalable cloud environment is a critical step in modern IT infrastructure management. This case study provides a detailed, step-by-step guide on how to deploy an Azure Landing Zone environment using GitHub Actions and Bicep templates. By leveraging a release pipeline and integrating OpenID Connect (OIDC) for authentication, we demonstrate a modern and efficient approach to cloud adoption that aligns with the Cloud Adoption Framework reference architecture.
The purpose of this case study is to empower readers with the knowledge and tools needed to implement Infrastructure as Code (IaC) practices effectively. We explore the benefits of using IaC, such as improved consistency, scalability, and automation, while highlighting the advantages of integrating GitHub Actions for seamless CI/CD workflows. Additionally, we discuss the deployment of a Virtual WAN (VWAN) hub, a key component in building a secure and connected cloud network.
This guide is designed for cloud architects, DevOps engineers, and IT professionals who are looking to streamline their deployment processes. We begin by outlining the prerequisites for getting started, followed by a high-level overview of the deployment process. Each step is explained in detail, with a focus on its purpose and implementation, ensuring readers can follow along and replicate the process in their own environments.
Whether you’re new to Azure or an experienced professional, this case study offers valuable insights into modern cloud deployment practices. By the end of this guide, you’ll have a clear understanding of how to deploy an Azure Landing Zone environment efficiently and securely using GitHub Actions, OIDC, and Bicep templates.
Understanding Key Concepts
What is a Landing Zone?
A Landing Zone in Azure is a foundational cloud environment designed to host workloads securely, efficiently, and at scale. It serves as the starting point for organizations adopting Azure, providing a structured framework to deploy resources while adhering to best practices. Think of it as a “ready-to-use” cloud environment that includes essential components such as networking, governance, identity, security, and monitoring.
The purpose of a landing zone is to ensure that workloads are deployed in a consistent and controlled manner, reducing risks and enabling scalability. It acts as a blueprint for cloud adoption, helping organizations align their deployments with business and technical requirements.

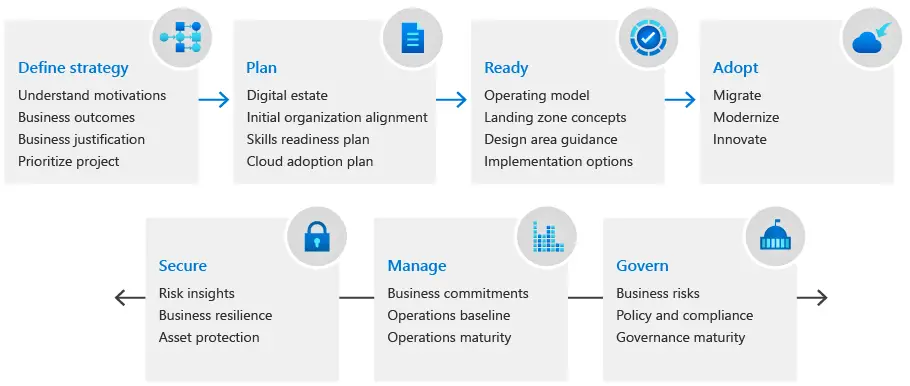
Importance in the Cloud Adoption Framework
The Cloud Adoption Framework (CAF) by Microsoft emphasizes the need for a landing zone as part of a successful cloud adoption strategy. The framework provides guidance on how to plan, adopt, govern, and manage cloud environments effectively. A landing zone is a critical element in this framework because it ensures that organizations can:
- Standardize deployments: By using predefined templates and configurations, landing zones eliminate inconsistencies in resource provisioning.
- Enhance security and compliance: Built-in governance policies and security controls ensure compliance with organizational and regulatory standards.
- Enable scalability: Landing zones are designed to grow with the organization, supporting future workloads and expansions.
- Accelerate cloud adoption: By providing a ready-to-use environment, landing zones reduce the time and effort required to start deploying workloads.
For organizations new to Azure, understanding and implementing a landing zone is essential to avoid common pitfalls and ensure a smooth transition to the cloud.
Infrastructure as Code (IaC)
Infrastructure as Code (IaC) is a modern approach to managing and provisioning cloud infrastructure through code rather than manual processes. IaC allows organizations to define their infrastructure using declarative or imperative scripts, enabling automation, consistency, and version control.
Benefits of IaC
- Consistency: IaC ensures that infrastructure is deployed in a repeatable and predictable manner, reducing human errors.
- Scalability: Automated scripts can scale resources up or down based on demand, making it easier to manage large environments.
- Version Control: Infrastructure definitions are stored in code repositories, allowing teams to track changes, roll back to previous versions, and collaborate effectively.
- Automation: IaC eliminates the need for manual configuration, speeding up deployments and reducing operational overhead.
- Cost Efficiency: By automating infrastructure management, organizations can optimize resource usage and reduce costs.
IaC Options
There are several tools and frameworks available for implementing IaC, including:
- ARM Templates: Azure Resource Manager (ARM) templates are JSON-based files used to define Azure resources. While powerful, they can be verbose and complex to manage.
- Bicep: A domain-specific language (DSL) for Azure that simplifies the syntax of ARM templates. Bicep is easier to read, write, and maintain, making it a preferred choice for Azure deployments.
- Terraform: A popular multi-cloud IaC tool that uses a declarative language to define infrastructure. Terraform is widely used for its flexibility and support for multiple cloud providers.
Why Bicep for This Case Study?
In this case study, we chose Bicep for several reasons:
- Azure-native: Bicep is specifically designed for Azure, ensuring seamless integration with Azure services.
- Simplified syntax: Compared to ARM templates, Bicep offers a cleaner and more concise syntax, making it easier to write and maintain.
- Improved tooling: Bicep provides better tooling support, including validation, linting, and integration with Visual Studio Code.
- No state management: Unlike Terraform, Bicep does not require state files, reducing complexity in managing infrastructure.
By using Bicep, we can streamline the deployment process while leveraging Azure-native capabilities.
Release Pipelines
A Release Pipeline is an automated workflow used to deploy applications and infrastructure in a controlled and repeatable manner. It is a key component of modern DevOps practices, enabling continuous integration and continuous deployment (CI/CD).
Manual Deployment vs. Release Pipelines
- Manual Deployment: Involves manually provisioning resources and deploying applications, which is time-consuming, error-prone, and difficult to scale.
- Release Pipelines: Automate the deployment process, ensuring consistency, reducing errors, and enabling faster releases.
Microsoft’s Release Pipeline Options
Microsoft offers two primary options for release pipelines:
- Azure DevOps: A comprehensive DevOps platform that includes pipelines, repositories, and boards. Azure DevOps pipelines are widely used for CI/CD workflows.
- GitHub Actions: A modern CI/CD solution integrated with GitHub repositories. GitHub Actions allows developers to define workflows using
.yamlfiles and automate deployments directly from their GitHub repositories.
Why GitHub Actions for This Case Study?
In this case study, we focus on GitHub Actions for several reasons:
- Integration with GitHub: GitHub Actions is tightly integrated with GitHub repositories, making it easy to trigger workflows based on code changes.
- Modern authentication with OIDC: GitHub Actions supports OpenID Connect (OIDC) for secure and scalable authentication, eliminating the need for secrets or service principals.
- Flexibility: GitHub Actions workflows are highly customizable, allowing us to define complex deployment processes using
.yamlfiles. - Cost-effectiveness: GitHub Actions is included with GitHub repositories, reducing the need for additional tools or platforms.
By using GitHub Actions, we can implement a streamlined and secure release pipeline for deploying the Azure Landing Zone environment.
Prerequisites
Before diving into the deployment process, it’s essential to ensure that your environment is properly set up with the required tools, permissions, and subscriptions. This section provides a detailed overview of the prerequisites needed to avoid common pitfalls and ensure a smooth deployment experience. Whether you’re new to Azure or an experienced professional, following these steps will help you prepare your system for the sequential phases of this case study.
Required Software
To begin, you’ll need to install the following tools on your local machine:
PowerShell 7.4 (or newer)
- PowerShell 7.4, formerly known as PowerShell Core, is a cross-platform version of PowerShell that supports modern cmdlets required for this deployment.
- Why PowerShell 7.4 and not Windows PowerShell?
Windows PowerShell is an older version that lacks compatibility with certain modern commands. PowerShell 7.4 provides enhanced functionality and cross-platform support, making it ideal for cloud deployments. - Installation Instructions:
- Download PowerShell for your operating system (Windows, macOS, or Linux).
- Follow the installation guide for your platform.
Azure CLI 2.55.0 (or newer)
- Azure CLI is a command-line tool designed to manage Azure resources. It complements PowerShell by providing additional commands specific to Azure services.
- Why Azure CLI?
While PowerShell can manage Azure resources, Azure CLI offers a streamlined experience for certain tasks, such as managing subscriptions and deploying resources. Both tools are used in this case study for different purposes. - Installation Instructions:
- Download Azure CLI for your operating system.
- Follow the installation guide for your platform.
Git (any supported version)
- Git is a version control system used to manage code repositories. It is essential for interacting with GitHub repositories during the deployment process.
- Why Git and not GitHub?
Git is the underlying tool for managing code locally, while GitHub is a platform for hosting repositories. You need Git installed on your local machine to clone, push, and pull changes from GitHub repositories. - Installation Instructions:
- Download Git for your operating system.
- Follow the installation guide for your platform.
Visual Studio Code
- Visual Studio Code is a lightweight code editor that provides excellent support for Bicep templates, YAML files, and Git integration.
- Installation Instructions:
ALZ Module
- The ALZ module is required for deploying Azure Landing Zones.
- Installation Command:
Run the following command in PowerShell to install the module:
Install-Module -Name ALZ
Ensure that PowerShell 7.4 is installed before running this command.
Azure Subscriptions and Permissions
To deploy the landing zone environment, you’ll need access to Azure subscriptions and administrative rights:
Azure Subscriptions
- At least three subscriptions are required, ideally four empty subscriptions to serve as logical containers for the deployment.
- These subscriptions will be used to organize resources and ensure proper governance.
Administrative Rights
- You must have administrative rights on your local machine to install software and run commands.
- Additionally, you need to be a Global Administrator within the desired Azure tenant.
- Ensure you have Owner access on the root management group to manage subscriptions effectively.
Avoiding Common Pitfalls
To ensure a smooth setup process, keep the following points in mind:
Difference Between Git and GitHub
- Git is a tool for managing code locally, while GitHub is a platform for hosting repositories. Both are essential for this case study, but you need to install Git on your local machine to interact with GitHub repositories.
PowerShell 7.4 vs. Windows PowerShell
- Ensure you install PowerShell 7.4 (or newer) as older versions like Windows PowerShell lack compatibility with modern commands required for this deployment.
Purpose of Azure CLI
- Azure CLI complements PowerShell by providing additional commands specific to Azure services. Both tools are used in this case study for different tasks, so ensure both are installed.
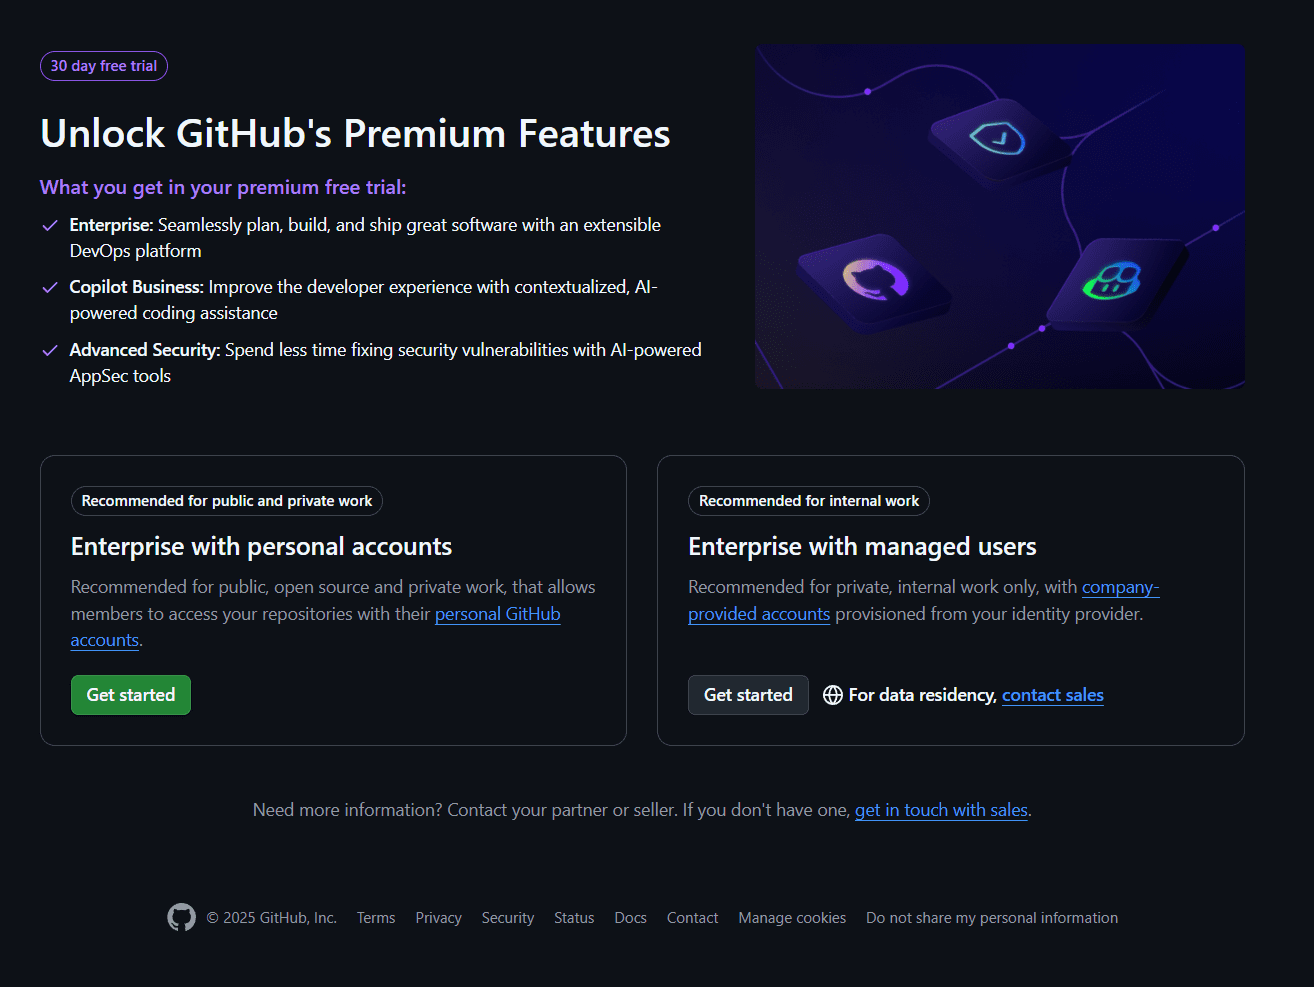
Phase 1: Setting Up GitHub Enterprise
Setting up GitHub Enterprise is a critical step in deploying your Azure Landing Zone environment. This phase involves creating a new GitHub Enterprise account, configuring single sign-on (SSO) and SCIM provisioning, and establishing an organization within the enterprise. By following these instructions, you’ll ensure a secure and scalable environment for managing repositories and release pipelines.
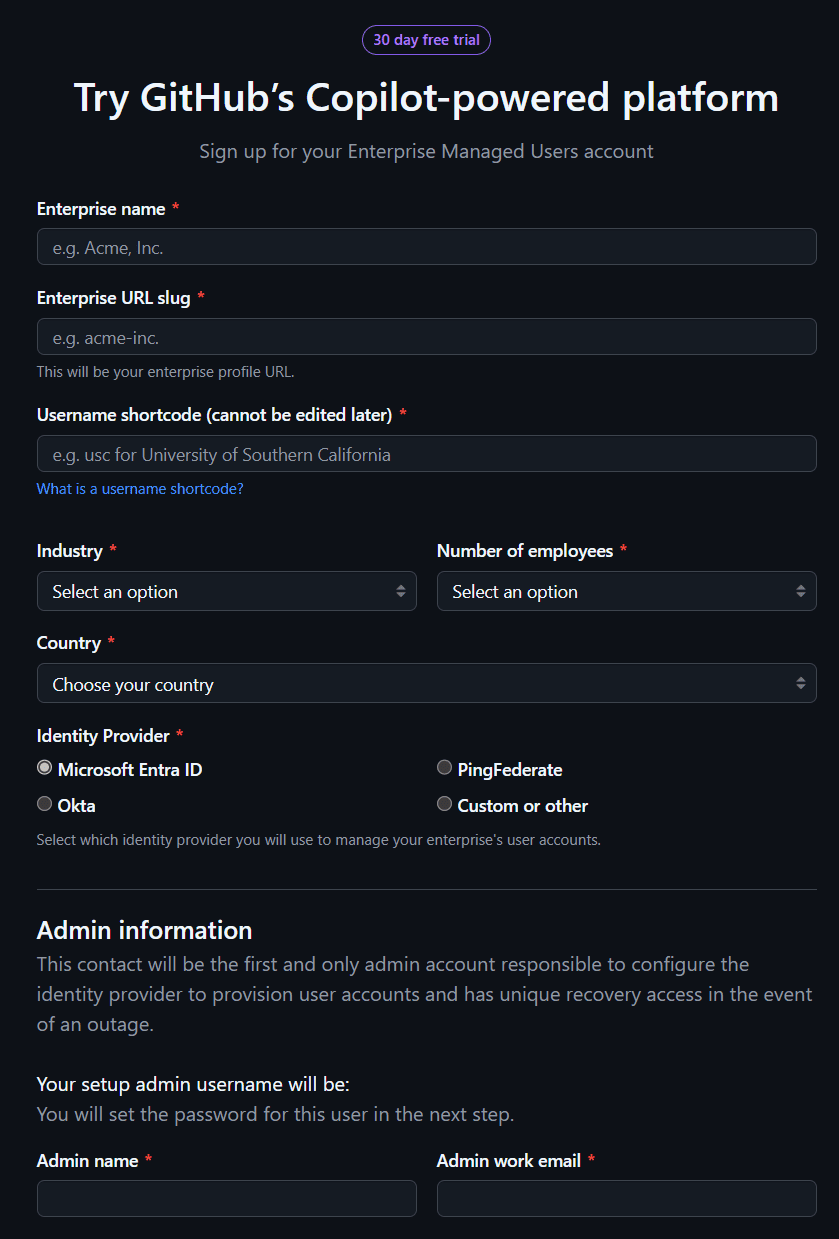
Step 1: Create a New GitHub Enterprise Account
If you don’t already have a GitHub Enterprise account, you’ll need to create one. We recommend creating a new user specifically for managing the enterprise, rather than using an existing GitHub account. This ensures separation of roles and responsibilities, particularly for administrative tasks.
Sign Up for a New GitHub Account
- Visit GitHub and create a new account.
Create a New Enterprise with Managed Users
- After signing up, create a new GitHub Enterprise account.
- Select the option for Enterprise with managed users, which is recommended for private, internal work environments. Managed users are provisioned from your identity provider, ensuring better control and security.
- Use a username that reflects your organization’s prefix or shortcode. For example, in this case study, we use the username
azrnav_admin, whereazrnavrepresents the organization prefix.
- Reset Admin Password
- After creating the admin account, check the admin’s inbox for instructions to reset the password.
- Log in as the admin user once the password is reset.
Step 2: Configure SCIM Provisioning and Single Sign-On
Once logged in as the admin user, you’ll need to configure SCIM provisioning and single sign-on (SSO). These steps ensure secure authentication and automated user provisioning.
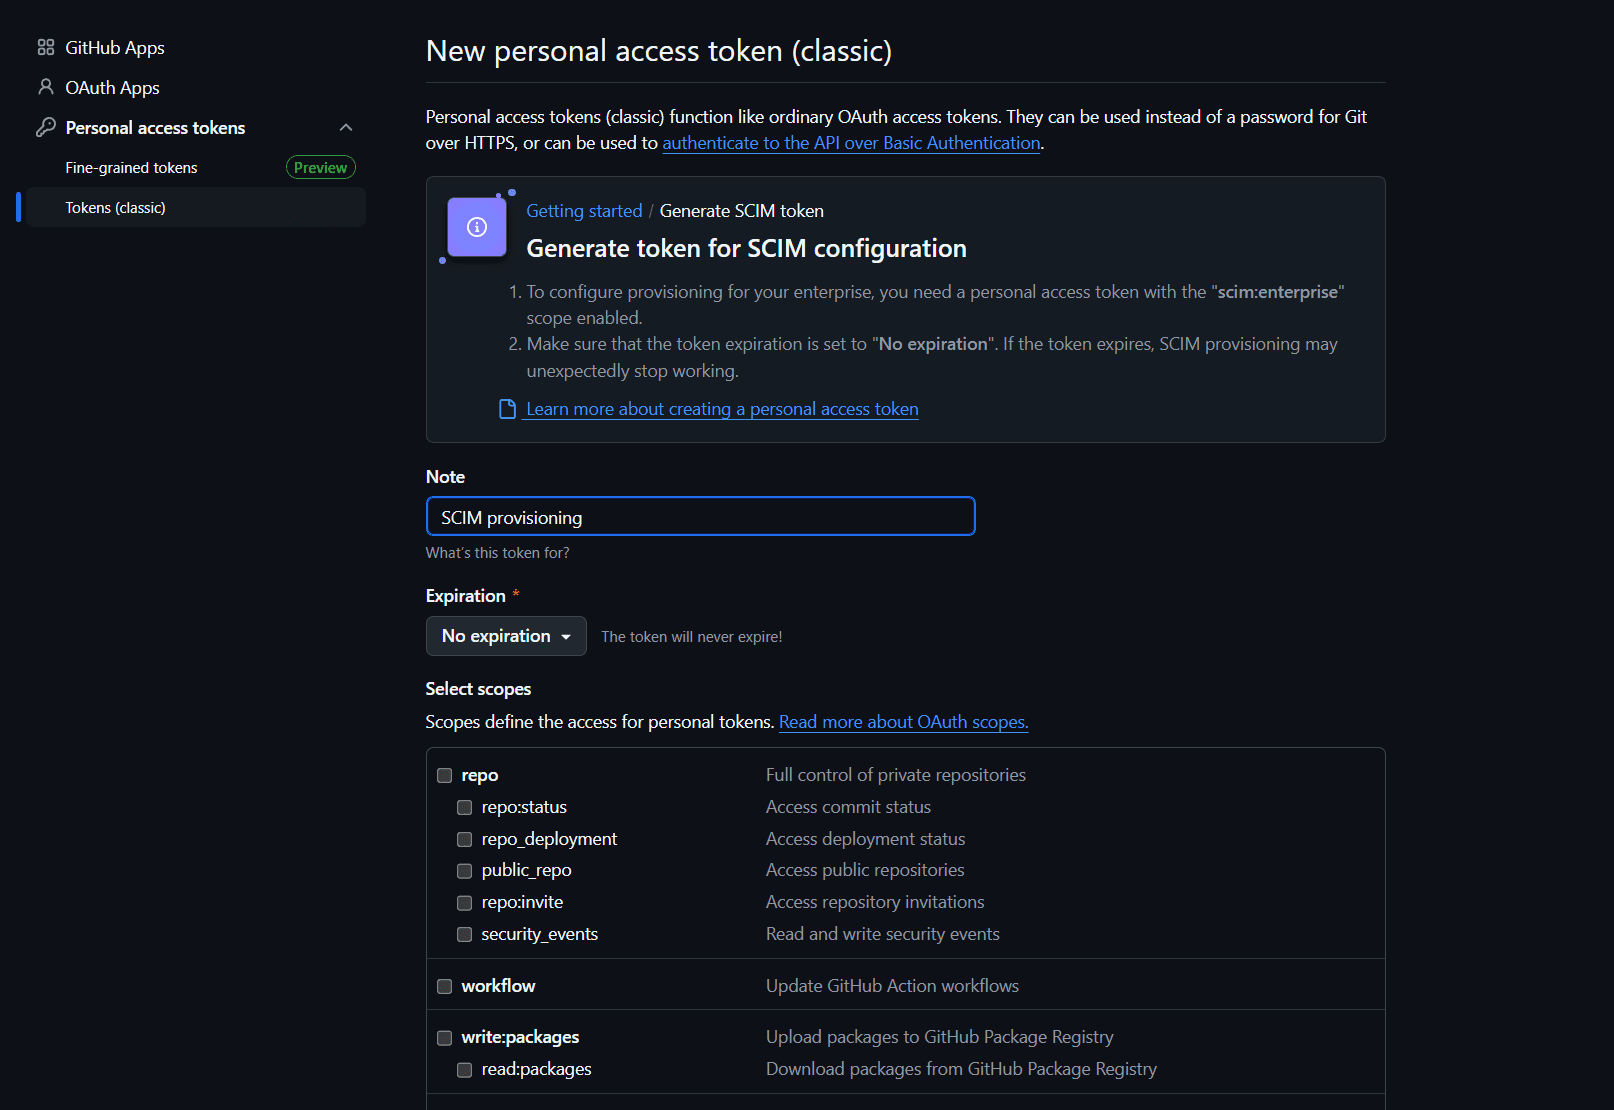
Generate SCIM Token
- Logged in as enterprise admin you will start with SCIM setup page in your GitHub Enterprise account.
- Generate a SCIM token, which will later be used for authentication via OIDC.
- Leave the default settings (
scim:enterprise) and generate a Personal Access Token (classic). Copy the token and store it in a secure place. You will need this token later as it acts as the secret key for the GitHub enterprise application.
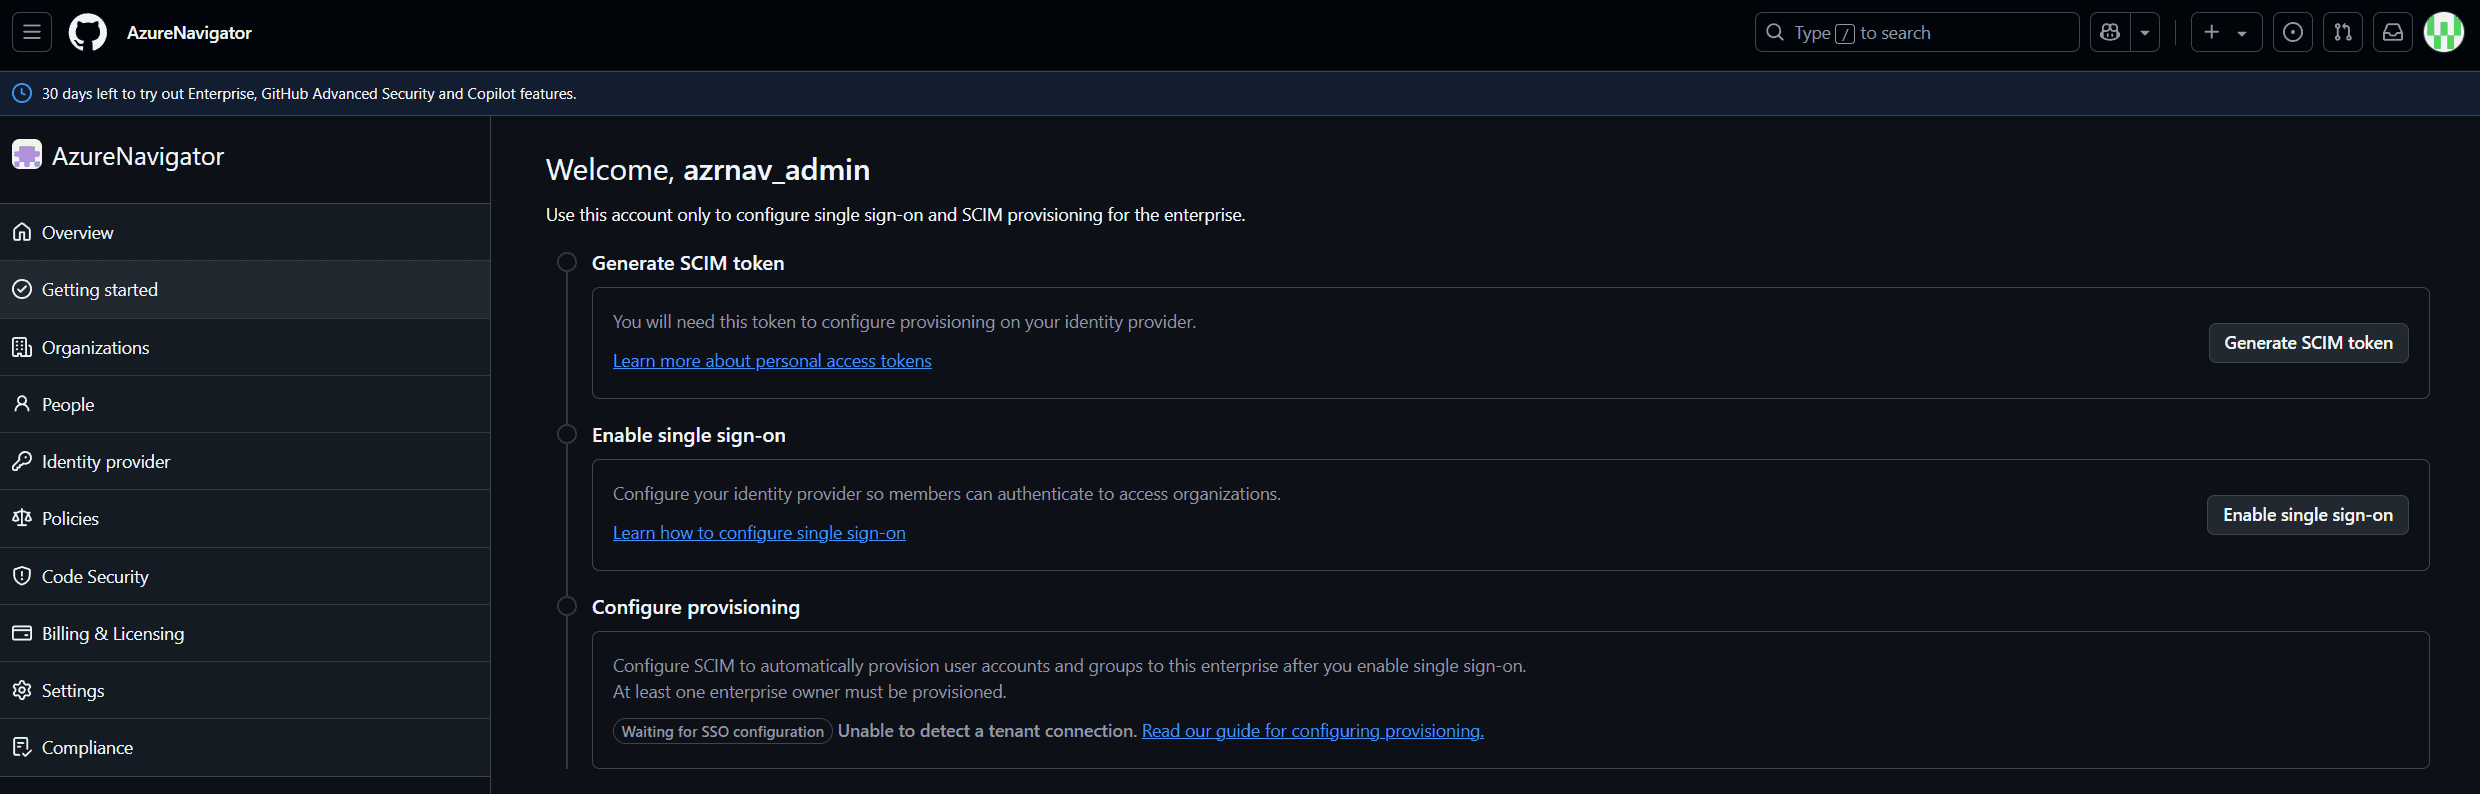
- Enable Single Sign-On (SSO)
- Configure single sign-on using OpenID Connect (OIDC).
- Follow the instructions provided in the GitHub documentation.
- Accept the permissions requested during setup.
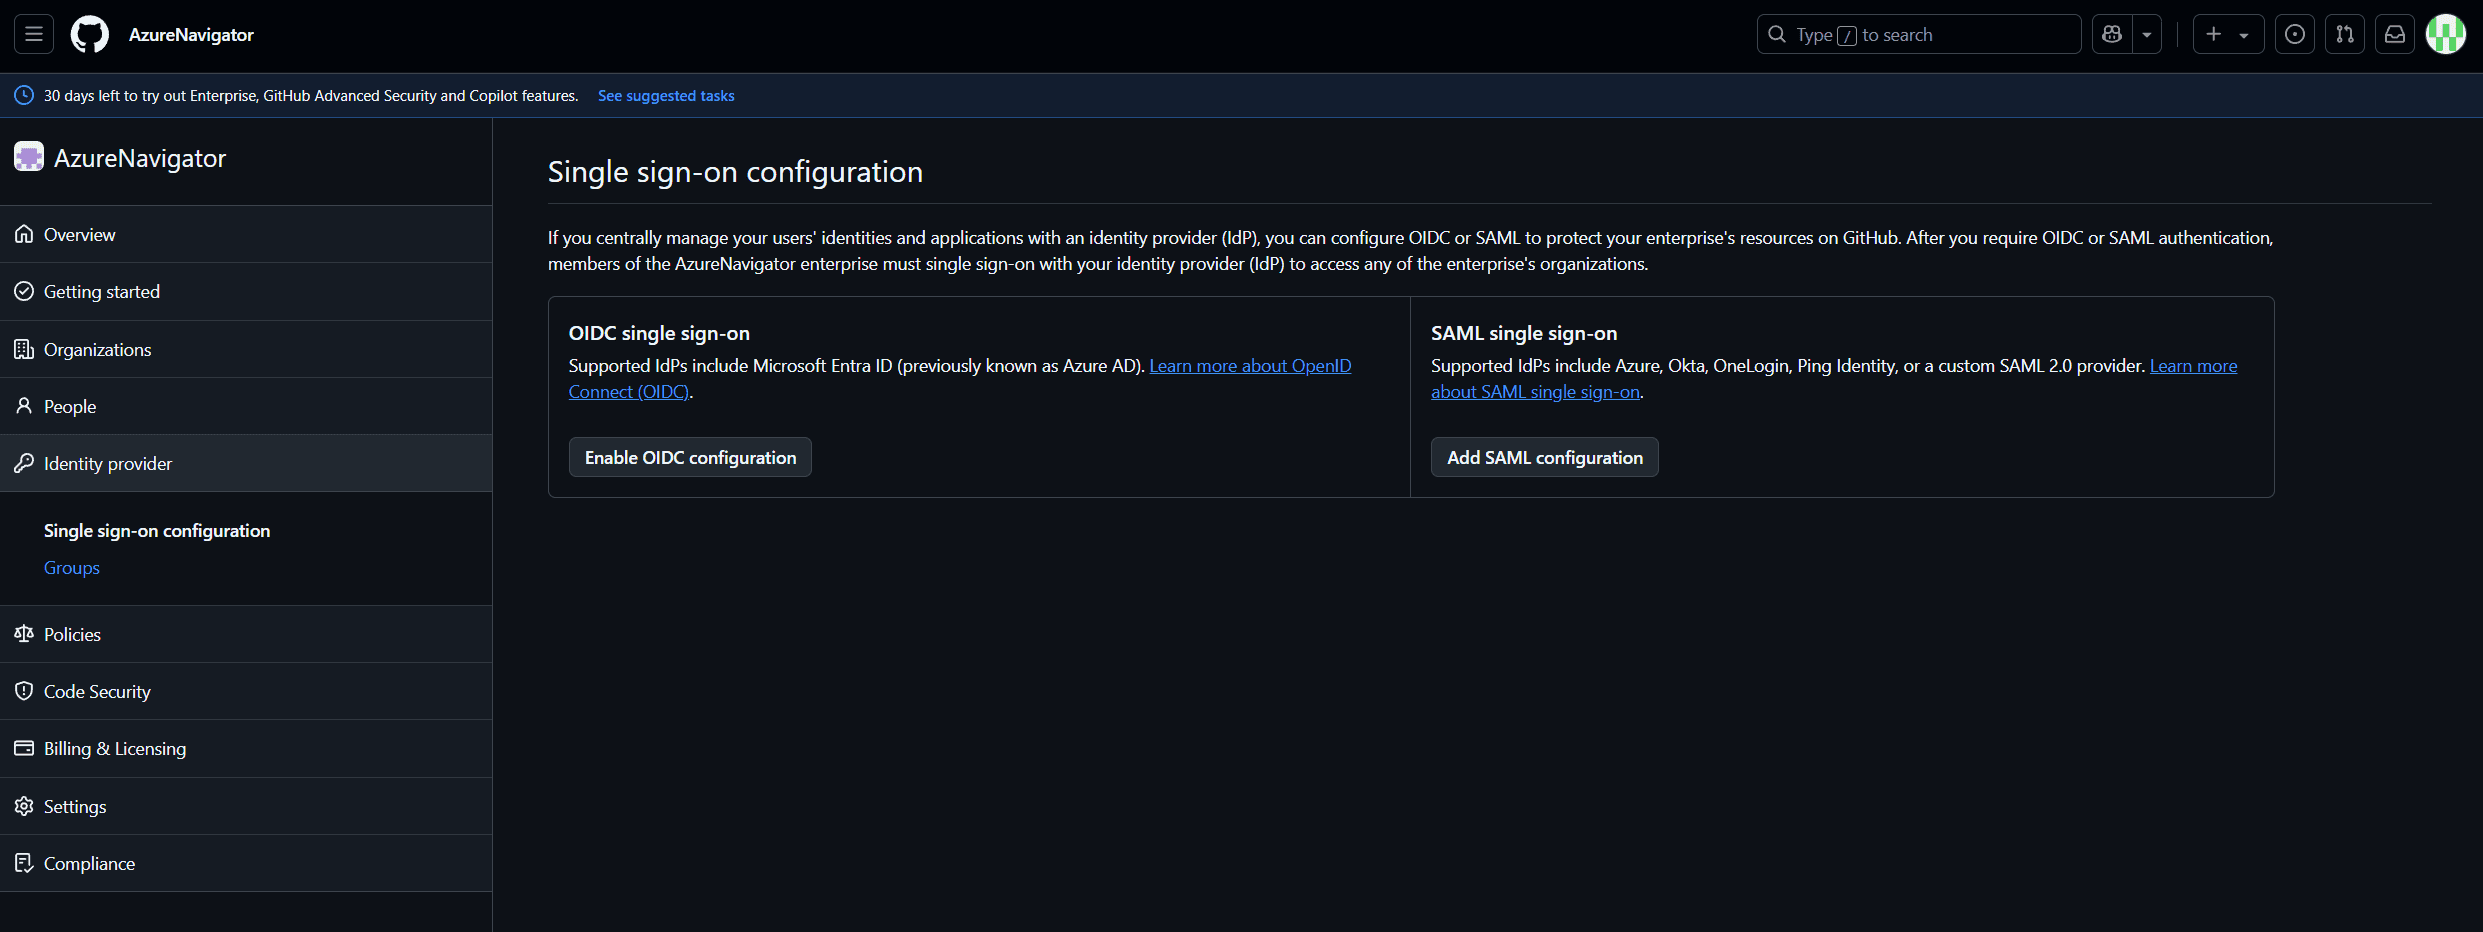

Configure Provisioning
- Navigate to the Azure portal and select ‘Enterprise applications‘. Then, search for ‘GitHub Enterprise Managed User (OIDC)’
- Within the “Users and groups” blade in Azure, define the scope for provisioning, specifying which users will have access to the enterprise.
Assign appropriate roles to these users. By doing this, you have complete control over who can access your GitHub Enterprise, allowing only specific users to gain entry.
- Assign the role of Enterprise Owner to a user within Entra ID before starting the synchronization process.
- Important: The user who created the enterprise (admin) should not be assigned this role, as their account is reserved for SCIM provisioning and SSO configuration.
- Switch from manual provisioning mode to automatic provisioning.
- Provide the Tenant URL and Secret Token:
- Tenant URL:
https://api.github.com/scim/v2/enterprises/{enterprise} - Secret Token: Use the SCIM token generated earlier.
- Tenant URL:
- Test the connection and save the settings.
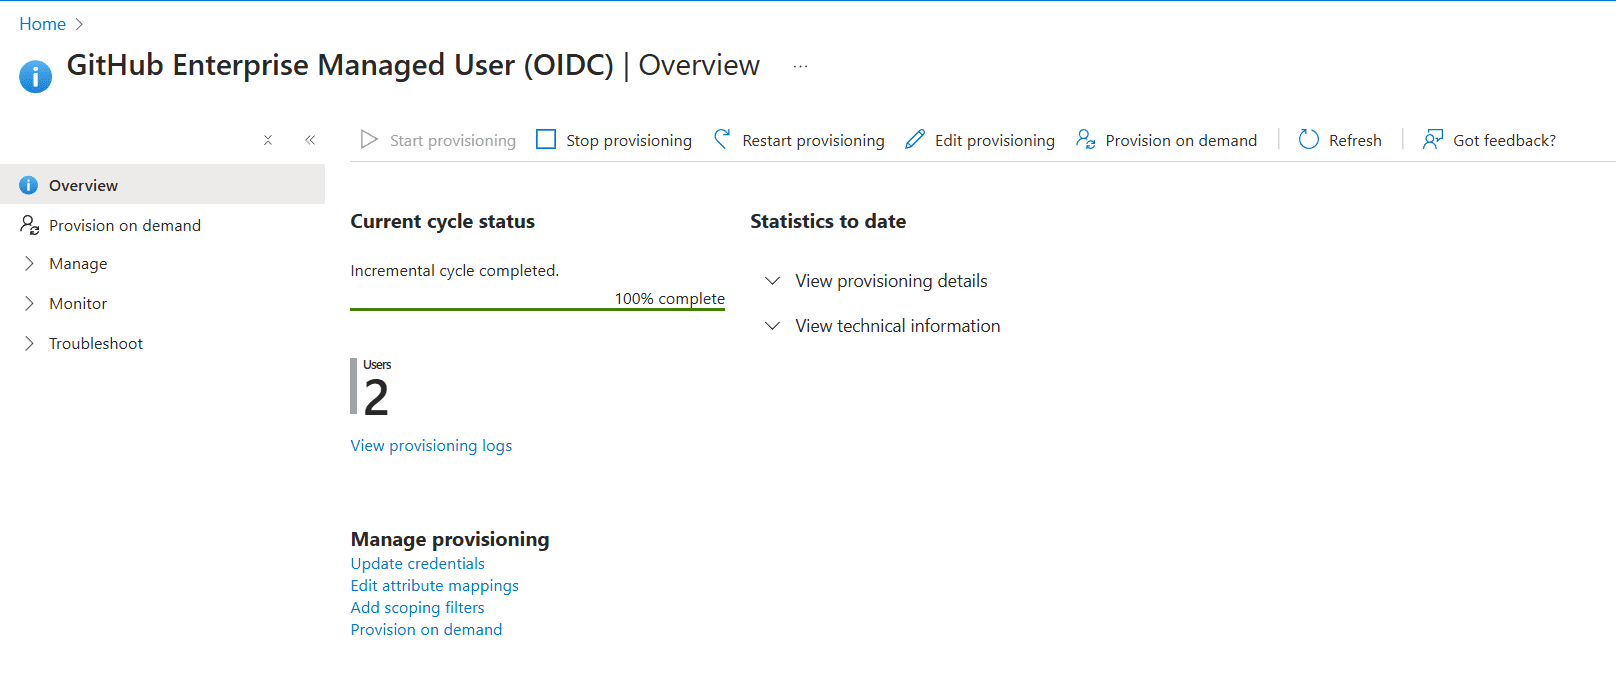
Sync Users
- Ensure that users are synced and visible within GitHub.
- If users are not visible, start provisioning or use the Provision on Demand option to sync relevant users.

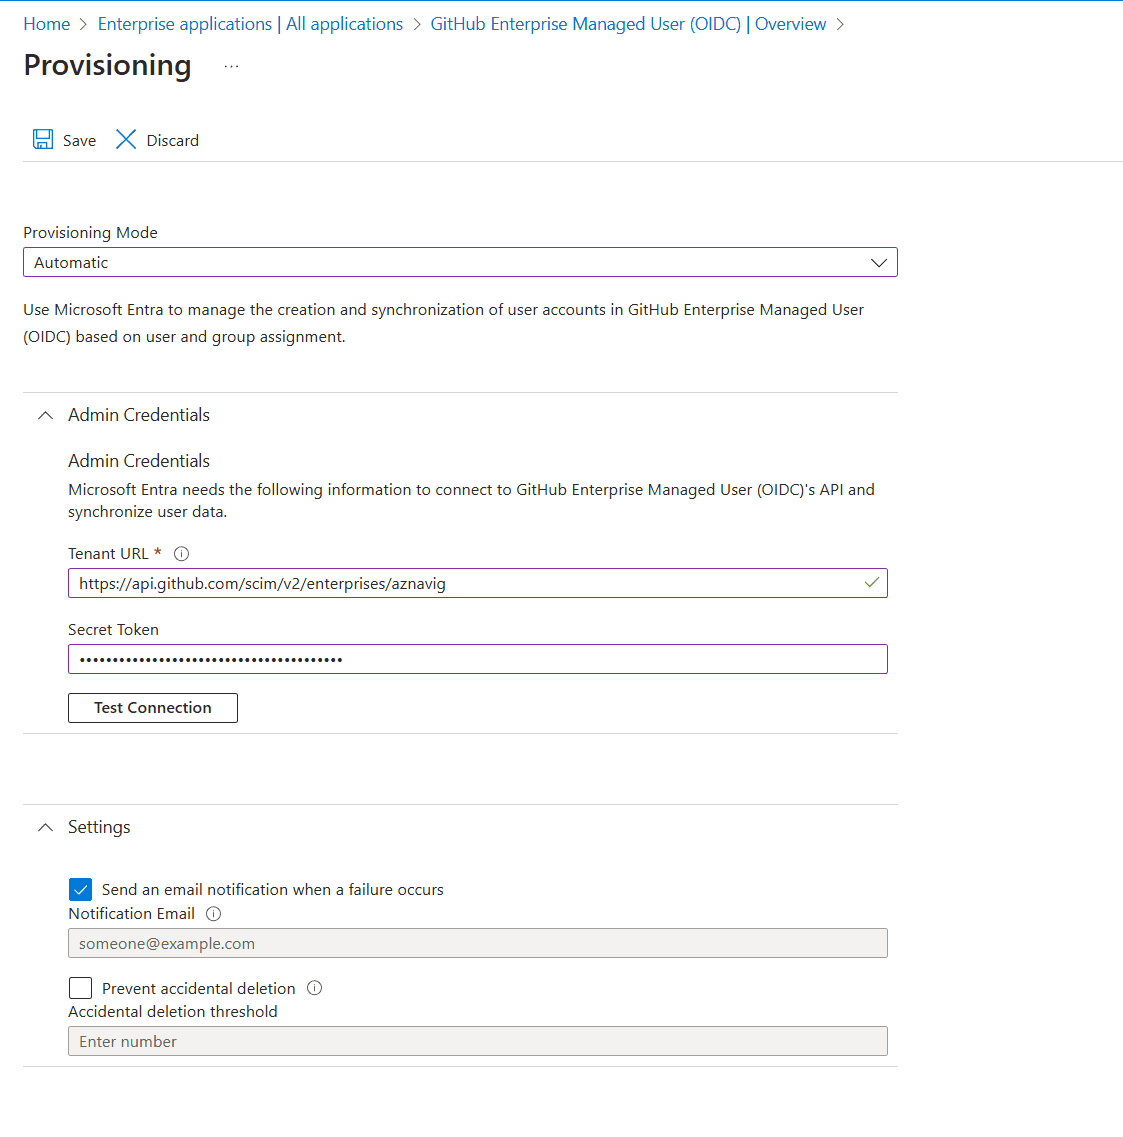
Example values for enterprise “aznavig”:
Tenant URL: https://api.github.com/scim/v2/enterprises/aznavig
Secret Token: ghp_a9YhKJrQWVcFgH3R7dEplmJbXyTzU04CDEF8
Enable Single Sign-On in GitHub
- Head back to GitHub and enable SSO.
- Set “Automatically redirect users to sign in” to On. This ensures that visitors to resources owned by your enterprise are redirected to your identity provider for authentication.
- Select your organization and click Authorize, then follow the prompts to allow SSO.
- Synced users from Entra ID can use their existing Entra ID UPN and password to log in to GitHub Enterprise.
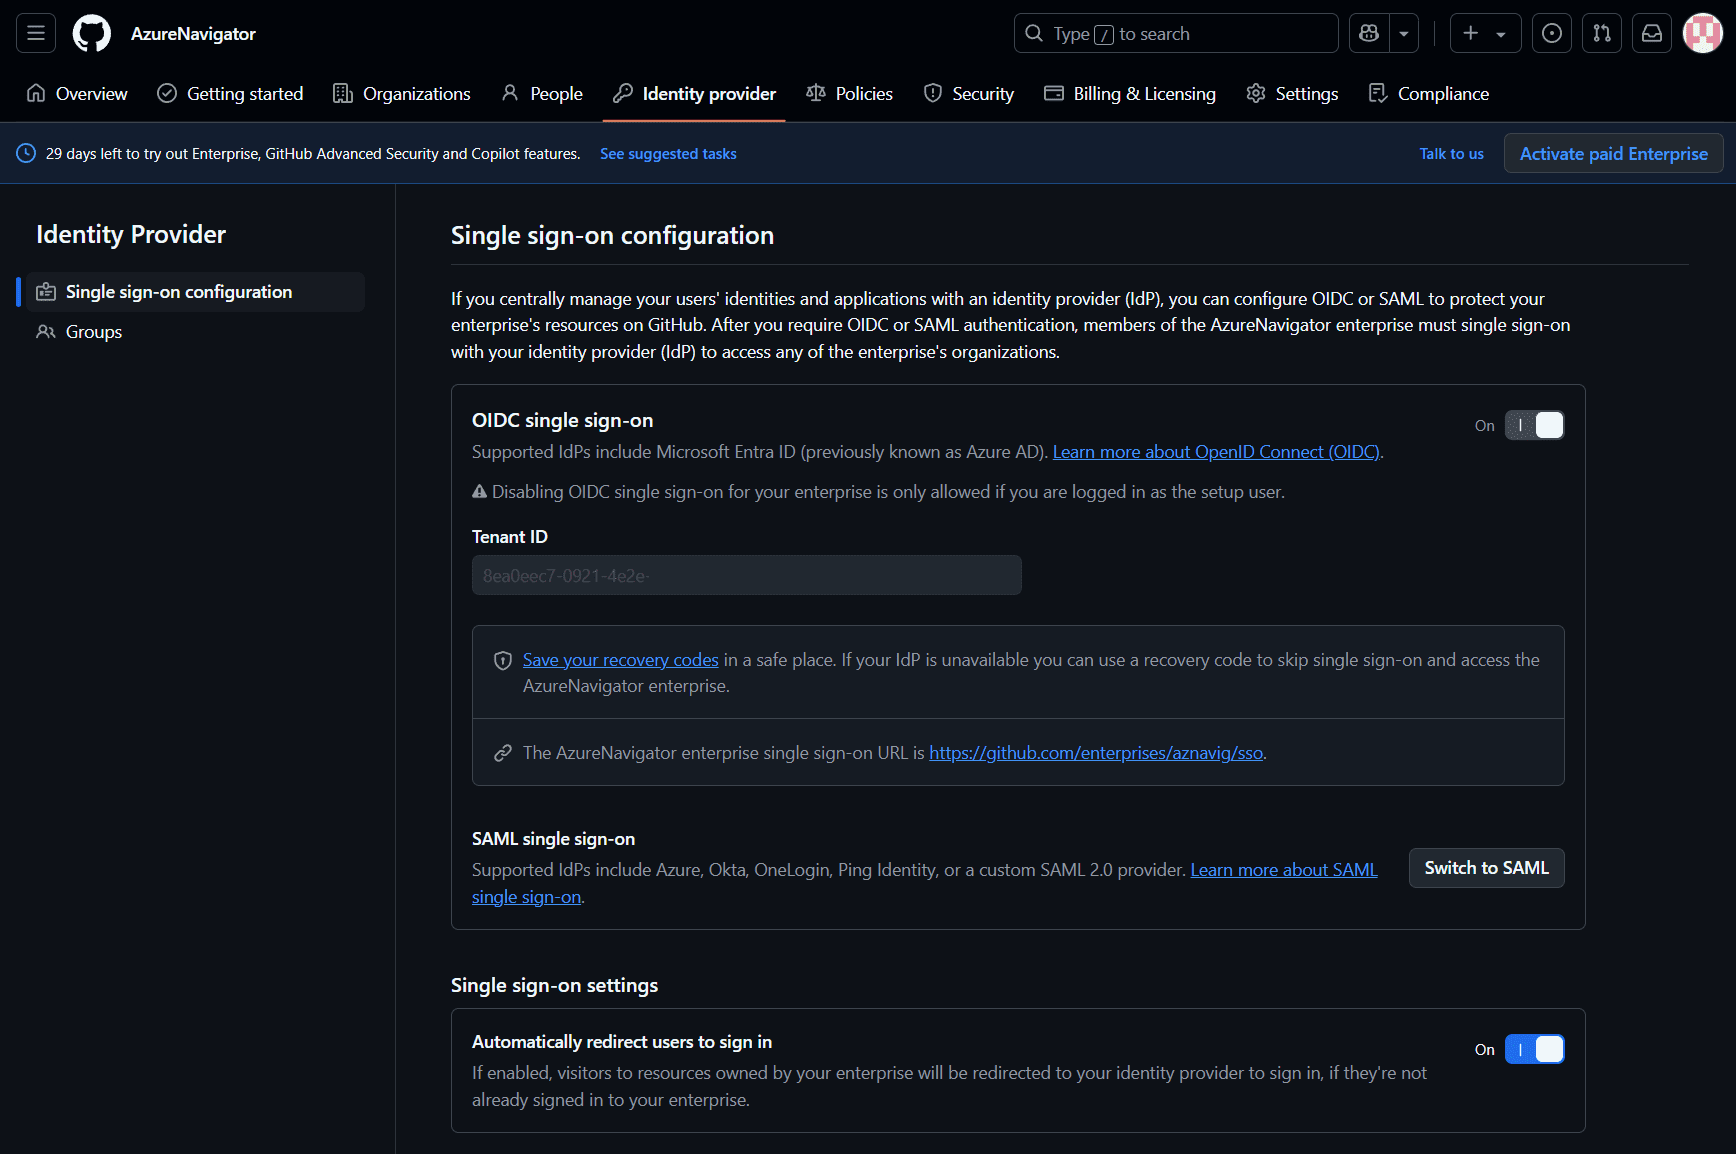
To ensure that only authorized users can access your GitHub Enterprise, use the provided authentication URL. Replace {enterprise} with your specific enterprise name in the URL https://github.com/enterprises/{enterprise}/sso to complete the authentication process. This will direct users to authenticate towards your organization
Example SSO URL:
SSO URL: https://github.com/enterprises/aznavig/sso
Step 3: Create an Organization Within the Enterprise
After configuring SCIM and SSO, the next step is to create an organization within the enterprise. Organizations act as logical containers for repositories and release pipelines.
Difference Between Enterprise and Organization
- An Enterprise is the overarching entity that manages multiple organizations.
- An Organization is a child item within the enterprise, serving as a container for repositories, workflows, and permissions.
Create the Organization
- The synced user with the Enterprise Owner role can now create a new organization.
This organization will serve as the container for repositories and GitHub Actions workflows.
Step 4: Generate Personal Access Tokens
To enable GitHub Actions workflows and self-hosted runners, you’ll need to generate two Personal Access Tokens (classic). Self-hosted runners are required because GitHub-hosted runners are not included in the GitHub Enterprise trial license. Self-hosted runners allow you to execute workflows on the to be deployed Azure infrastructure, ensuring compatibility during the trial period.
First Token
As an organizational admin, follow these steps to navigate to the personal access tokens section on GitHub:
- Click on your profile picture located in the upper right corner of the GitHub page.
- From the dropdown menu, select “Settings”.
- In the settings menu, navigate to “Developer settings”.
- Within the “Developer settings” section, select “Tokens (classic)” under the “Personal access tokens” category.
- Enter
Azure Landing Zone Terraform Acceleratorin theNotefield. - Generate a token with the following permissions:
repoworkflowadmin:orguser:read:useruser:emaildelete_repo
Second Token
- Enter
Azure Hosted Runnersin theNotefield. - Generate a second token with the same permissions as the first token.
- Set the expiration field to No Expiration. This token will be used for self-hosted runners, ensuring uninterrupted workflow execution during the trial period.
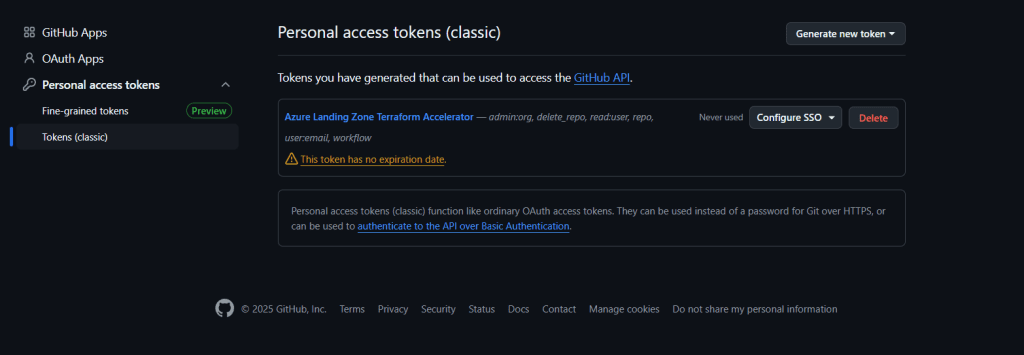
While it is possible to use a single token without an expiration date, as shown in the screenshot, we recommend creating two separate tokens for better security and management. This approach ensures that you have a backup token and can manage access more effectively.
Conclusion of Phase 1
At this point, you’ve successfully set up GitHub Enterprise, configured SCIM provisioning and SSO, created an organization, and generated the necessary tokens. You’re now ready to proceed to Phase 2, where we’ll bootstrap the deployment process.
Phase 2: Bootstrapping the Deployment
The bootstrapping phase is a critical step in setting up the Azure Landing Zone environment. This phase involves creating the foundational repositories, configuring the deployment pipeline, and triggering the initial deployment process. The purpose of this phase is to establish the infrastructure and workflows required for managing and deploying resources efficiently. By the end of this phase, you will have a structured environment ready for resource deployment via GitHub Actions.
Purpose of the Bootstrap Phase
The bootstrap phase serves several key purposes:
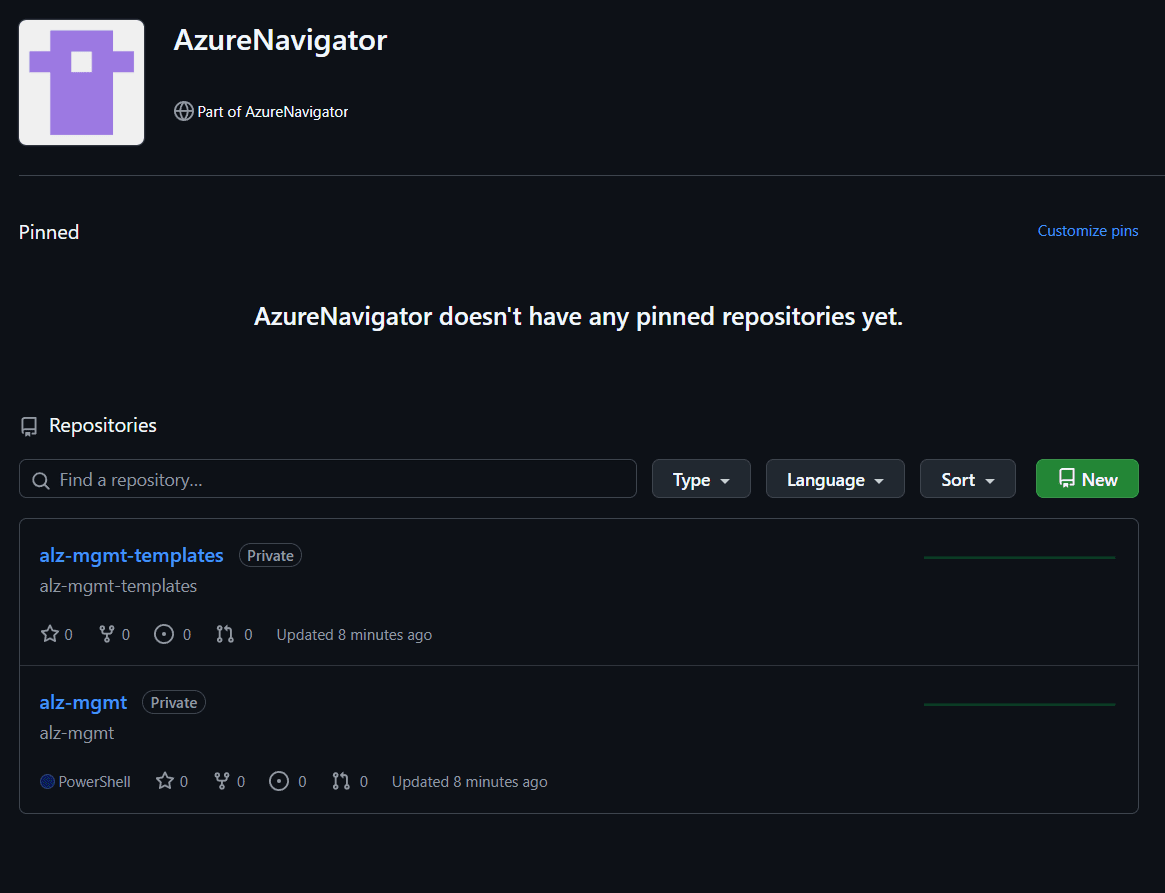
Repository Creation: Establish two private repositories within your GitHub organization:
alz-mgmt: This repository is the operational hub for managing the deployment process. It contains the GitHub Actions workflows that automate the deployment of the Azure Landing Zone environment. This is where the actual deployment logic resides, including scripts, configuration files, and CI/CD workflows.alz-mgmt-templates: This repository serves as a library of reusable templates and configurations for Azure Landing Zone deployments. It stores Bicep templates, parameter files, and documentation that define the Azure resources to be deployed. These templates are consumed by the workflows in thealz-mgmtrepository.
Why Two Repositories?
- Separation of Concerns: By splitting the repositories, you can clearly distinguish between operational workflows (
alz-mgmt) and reusable templates (alz-mgmt-templates). This makes it easier to manage and maintain each repository independently. - Reusability: The
alz-mgmt-templatesrepository can be reused across multiple projects or environments, while thealz-mgmtrepository is specific to the deployment process for this case study. - Security: Sensitive workflows and deployment configurations are kept in
alz-mgmt, while reusable templates are stored separately inalz-mgmt-templates.
Pipeline Configuration: Set up the release pipeline using a YAML file to define the deployment process. This pipeline will automate the deployment of resources and ensure consistency across environments.
Initial Deployment: Trigger the bootstrap deployment to create foundational resources, including self-hosted runners and other necessary components.
Step 1: Create Local Folder Structure and YAML File
Start by creating the required folder structure and an empty YAML file on your local machine. Use the following commands in PowerShell (ensure you are using PowerShell 7.4 or newer):
					New-Item -ItemType "file" c:\accelerator\config\inputs.yaml -Force
New-Item -ItemType "directory" c:\accelerator\output
- Folder Structure:
c:\accelerator\config: This folder will contain the YAML file with deployment inputs.c:\accelerator\output: This folder will store the output files generated during the deployment process.
Step 2: Edit the YAML File
The YAML file defines the inputs required for the deployment process. You will need to include your Azure subscription IDs and other configuration details. We recommend using a separate subscription for bootstrap resources, such as self-hosted runners.
The YAML file you created earlier will be empty by default. You need to populate it with the required configuration for the deployment process. Follow these steps:
Open the YAML File in Visual Studio Code
- Navigate to the file location:
c:\accelerator\config\inputs.yaml. - Open the file in Visual Studio Code. If you don’t have Visual Studio Code installed, refer to the installation guide.
- Navigate to the file location:
Copy and Paste the YAML Content
- Copy the following YAML content into the file:
					---
# For detailed instructions on using this file, visit:
# https://github.com/Azure/ALZ-PowerShell-Module/wiki/%5BUser-Guide%5D-Quick-Start-Phase-2-GitHub#2221-github-with-bicep

# Basic Inputs
iac_type: "bicep"
bootstrap_module_name: "alz_github"
starter_module_name: "complete"

# Shared Interface Inputs
bootstrap_location: "<region>"
starter_locations: ["<region>"]
root_parent_management_group_id: ""
subscription_id_management: "<management-subscription-id>"
subscription_id_identity: "<identity-subscription-id>"
subscription_id_connectivity: "<connectivity-subscription-id>"

# Bootstrap Inputs
github_personal_access_token: "<token-1>"
github_runners_personal_access_token: "<token-2>"
github_organization_name: "<github-organization>"
use_separate_repository_for_templates: true
bootstrap_subscription_id: ""
service_name: "alz"
environment_name: "mgmt"
postfix_number: 1
use_self_hosted_runners: true
use_private_networking: true
allow_storage_access_from_my_ip: false
apply_approvers: ["<email-address>"]
create_branch_policies: true

# Starter Module Specific Variables
# (Details: https://github.com/Azure/ALZ-PowerShell-Module/wiki/%5BUser-Guide%5D-Starter-Module-Bicep-Complete)
Prefix: "alz"
Environment: "live"
networkType: "hubNetworking"
SecurityContact: "<email-address>"

# Advanced Inputs
bootstrap_module_version: "latest"
starter_module_version: "latest"
#output_folder_path: "/accelerator/output"
Fully Working Example YAML
Below is a fully configured YAML file for bootstrapping the Azure Landing Zone deployment. This file includes all necessary values, such as subscription IDs, GitHub tokens, and configuration parameters. Ensure that all values are correctly retrieved and inserted to avoid deployment errors.
					---
# For detailed instructions on using this file, visit:
# https://github.com/Azure/ALZ-PowerShell-Module/wiki/%5BUser-Guide%5D-Quick-Start-Phase-2-GitHub#2221-github-with-bicep

# Basic Inputs
iac_type: "bicep"
bootstrap_module_name: "alz_github"
starter_module_name: "complete"

# Shared Interface Inputs
bootstrap_location: "westeurope"
starter_locations: ["westeurope"]
root_parent_management_group_id: ""
subscription_id_management: "9a31282d-8df4-48cd-8f94-f751aba2e31d"
subscription_id_identity: "eb10128c-21dc-44a0-a31b-00675aef0956"
subscription_id_connectivity: "460ebd49-3785-46c9-6fe0-1c74f5afdaa2"

# Bootstrap Inputs
github_personal_access_token: "ghp_QSFBwK5NG7TCxWubHOUtVDQ1BF3v3NVG"
github_runners_personal_access_token: "ghp_0Eh2V9U4hBre16XU3sAiMdpvhFC8BMD0"
github_organization_name: "AzNavigator"
use_separate_repository_for_templates: true
bootstrap_subscription_id: "c39a0dbe-18bd-4188-6cfe-2d49a2ae31c5"
service_name: "alz"
environment_name: "mgmt"
postfix_number: 1
use_self_hosted_runners: true
use_private_networking: true
allow_storage_access_from_my_ip: false
apply_approvers: ["steven@azurenavigator.xyz"]
create_branch_policies: true

# Starter Module Specific Variables
# (Details: https://github.com/Azure/ALZ-PowerShell-Module/wiki/%5BUser-Guide%5D-Starter-Module-Bicep-Complete)
Prefix: "alz"
Environment: "live"
networkType: "vwanConnectivity"
SecurityContact: "gregor@azurenavigator.xyz"

# Advanced Inputs
bootstrap_module_version: "latest"
starter_module_version: "latest"
#output_folder_path: "/accelerator/output"
Explanation of YAML Values
Subscriptions
- Management Subscription: Used for managing resources such as policies and governance. Retrieve the subscription ID from the Azure portal.
- Connectivity Subscription: Used for networking resources, such as Virtual WAN hubs or hub-and-spoke configurations. Retrieve the subscription ID from the Azure portal.
- Identity Subscription: Used for identity-related resources, such as Entra ID integrations. Retrieve the subscription ID from the Azure portal.
- Bootstrap Subscription: Used for deploying bootstrap resources, such as self-hosted runners. This subscription should ideally be separate from the management subscription, but it can be the same if desired.
Bootstrap
- Location: Specifies the Azure region where bootstrap resources will be deployed. In this example, we use
westeuropeas the primary region. You can select a different region based on your requirements.
GitHub Organization
- Organization: The name of your GitHub organization. Ensure you use the organization name (
AzNavigator) and not the enterprise name (aznavig). - Token-1 and Token-2: These are the Personal Access Tokens (classic) created earlier. If only one token with no expiration exists, use the same value for
token-2as fortoken-1.
Retrieve the name of your GitHub organization, as the organization name is typically different from the enterprise name. Be sure to use the organization name, not the enterprise name.
- Name of Organization:
https://github.com/AzNavigator - Name of Enterprise:
https://github.com/enterprises/aznavig
github_organization_name: AzNavigator
Service Name
- Purpose: Used to build the names of Azure and GitHub resources. For example,
rg-<service_name>-mgmt-westeurope-001. - Recommended Value:
alz(Azure Landing Zone).
Environment Name
- Purpose: Further defines the names of Azure and GitHub resources. For example,
rg-alz-<environment_name>-westeurope-001. - Recommended Value: In this case study, we use
vwanConnectivityto reflect the connectivity environment.
Network Type
- Allowed Values:
hubNetworking: Deploys a hub-and-spoke network topology.hubNetworkingMultiRegion: Deploys a hub-and-spoke topology across multiple regions.vwanConnectivity: Deploys a Virtual WAN network topology.vwanConnectivityMultiRegion: Deploys a Virtual WAN topology across multiple regions.none: No network configuration is deployed.
- Example: In this case study, we use
vwanConnectivityto deploy a Virtual WAN hub.
Important Notes
- Do Not Comment Out Values: Every value in the YAML file is required for the bootstrap execution. Missing or incorrect values will result in deployment errors.
- Validate Subscription IDs: Ensure all subscription IDs are retrieved from the Azure portal and correctly inserted into the YAML file.
- Verify Tokens: Confirm that the Personal Access Tokens (
token-1andtoken-2) are correctly generated and inserted. If only one token exists, use the same value for both. - Double-Check Values: Validate all values, including
service_name,environment_name, andnetworkType, to avoid deployment errors.
By following these steps and using the example YAML file, you’ll ensure a smooth bootstrap deployment process.
Retrieve the list of networking types here: Bicep – Complete | Azure Landing Zones Documentation
Retrieve the full set of instructions for this .yaml here: GitHub with Bicep | Azure Landing Zones Documentation
- Ensure to save your changes.
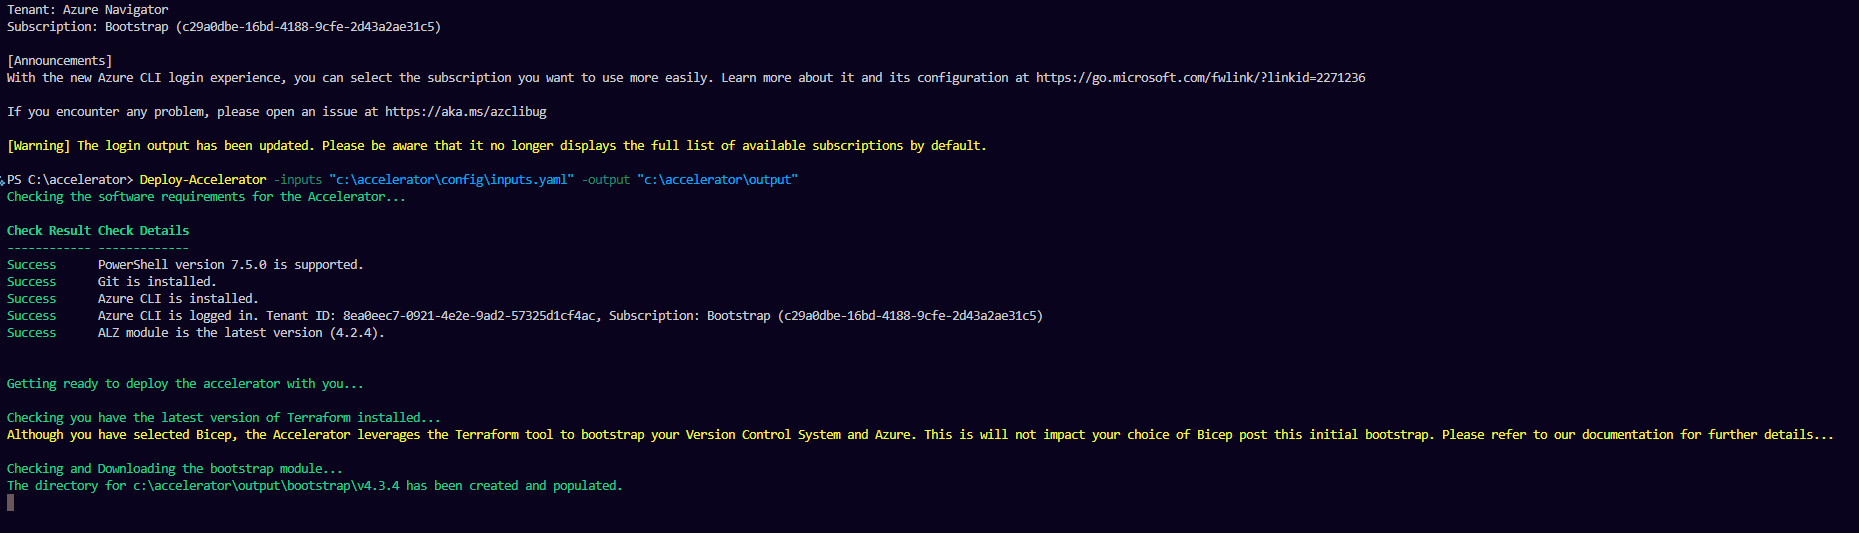
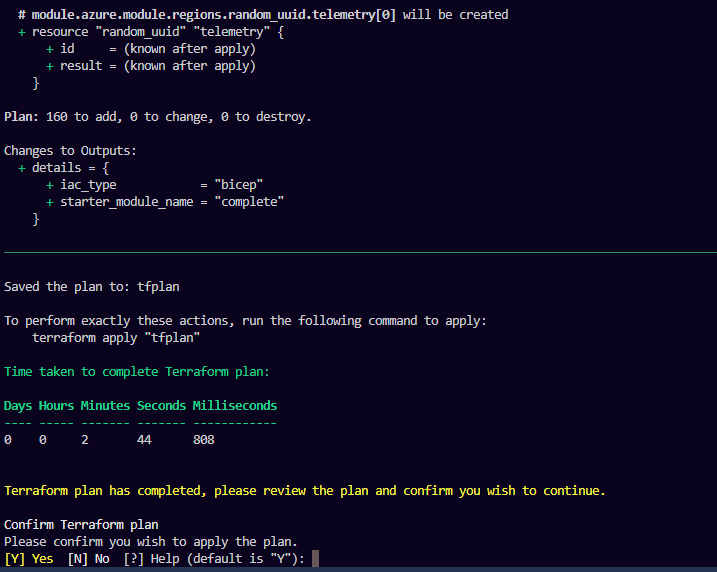
Step 3: Trigger the Bootstrap Deployment
Once the YAML file is configured, you can trigger the bootstrap deployment using the following command:
Deploy-Accelerator -inputs "c:\accelerator\config\inputs.yaml" -output "c:\accelerator\output"
- Plan Phase: The deployment process will pause after the plan phase, allowing you to validate what is going to be deployed. Review the plan carefully before proceeding.
- Deployment Phase: After validation, the deployment will continue. This process typically takes around 20 minutes to complete.
Avoiding Common Pitfalls
- Ensure Proper Permissions: Verify that you have administrative rights on your local machine and owner access to the root management group.
- Use PowerShell 7.4: Do not use Windows PowerShell, as it lacks compatibility with the required commands.
- Validate YAML File: Double-check the subscription IDs and other values in the YAML file to avoid deployment errors.
Handling Deployment Failures
If the deployment fails for any reason, it’s important to start clean to avoid Terraform conflicts that can lead to repeated deployment failures when rerunning the Deploy-Accelerator command. Follow these steps to ensure a clean slate before retrying the deployment:
Steps to Clean Up
- Delete contents of the local output folder, typically located at “C:\Accelerator\Output\”
Delete Existing GitHub Repositories
- Remove the repositories created during the bootstrap phase, such as
alz-mgmtandalz-mgmt-templates. - This ensures that no residual configurations interfere with the redeployment.
- Remove the repositories created during the bootstrap phase, such as
Delete GitHub Runners
- Self-hosted runners persist even after repositories are deleted.
- Navigate to your GitHub organization settings:
- Go to Actions > Runners.
- Delete all existing runners associated with the organization.
Delete GitHub Teams
- Remove any teams created during the deployment, such as
alz-mgmt-approvers. - This ensures no lingering permissions or configurations remain.
- Remove any teams created during the deployment, such as
Delete All Azure Resources
- Remove all resources deployed within the bootstrap subscription.
- Typically, these resources include container Instances and other infrastructure components.
- Use the Azure Portal, CLI, or PowerShell to delete these resources.
Delete Custom Role Assignments
- Custom role assignments are typically found on:
- The root management group.
- Individual subscriptions such as management, connectivity, identity, and bootstrap.
- Use the Azure Portal, CLI, or PowerShell to remove these assignments.
- Custom role assignments are typically found on:
Delete Custom Role Definitions
- After removing role assignments, delete the custom role definitions.
- These roles typically start with “Azure Landing Zones” and include four custom RBAC roles.
- Ensure all custom roles are removed to avoid conflicts during redeployment.
By following these cleanup steps, you’ll ensure that all residual configurations and resources are removed, allowing you to start fresh and avoid Terraform conflicts. Once the cleanup is complete, you can proceed with rerunning the Deploy-Accelerator command.
Conclusion of Phase 2
By completing the bootstrap phase, you’ve established the foundational repositories and triggered the initial deployment process. This phase sets the stage for deploying resources via GitHub Actions in the next phase. You are now ready to proceed to Phase 3: Deploying Resources via GitHub Actions, where we will focus on deploying the Azure Landing Zone environment.
Phase 3: Deploying Resources via GitHub Actions
In this phase, we will deploy the Azure Landing Zone environment using GitHub Actions. This involves running workflows in the alz-mgmt repository, monitoring the deployment process, and verifying the successful creation of the landing zone environment. By the end of this phase, you will have a fully functional Azure Landing Zone environment, complete with a Virtual WAN (VWAN) hub, assigned policy definitions, and a structured management group hierarchy.
Step 1: Open the alz-mgmt Repository
Navigate to the
alz-mgmtrepository in your GitHub organization.- This repository contains the GitHub Actions workflows responsible for managing the deployment process.
- No modifications to the repository are needed in this case study, as all required configurations are already in place.
Interaction Between Repositories:
- The
alz-mgmtrepository interacts with thealz-mgmt-templatesrepository to retrieve reusable Bicep templates and configurations. - While the
alz-mgmtrepository handles the deployment logic (workflows), thealz-mgmt-templatesrepository provides the infrastructure definitions (templates). - If changes are required, such as modifying resource configurations, these would typically be made in the
alz-mgmt-templatesrepository.
- The
Step 2: Select and Run the Workflow
Navigate to GitHub Actions:
- Within the
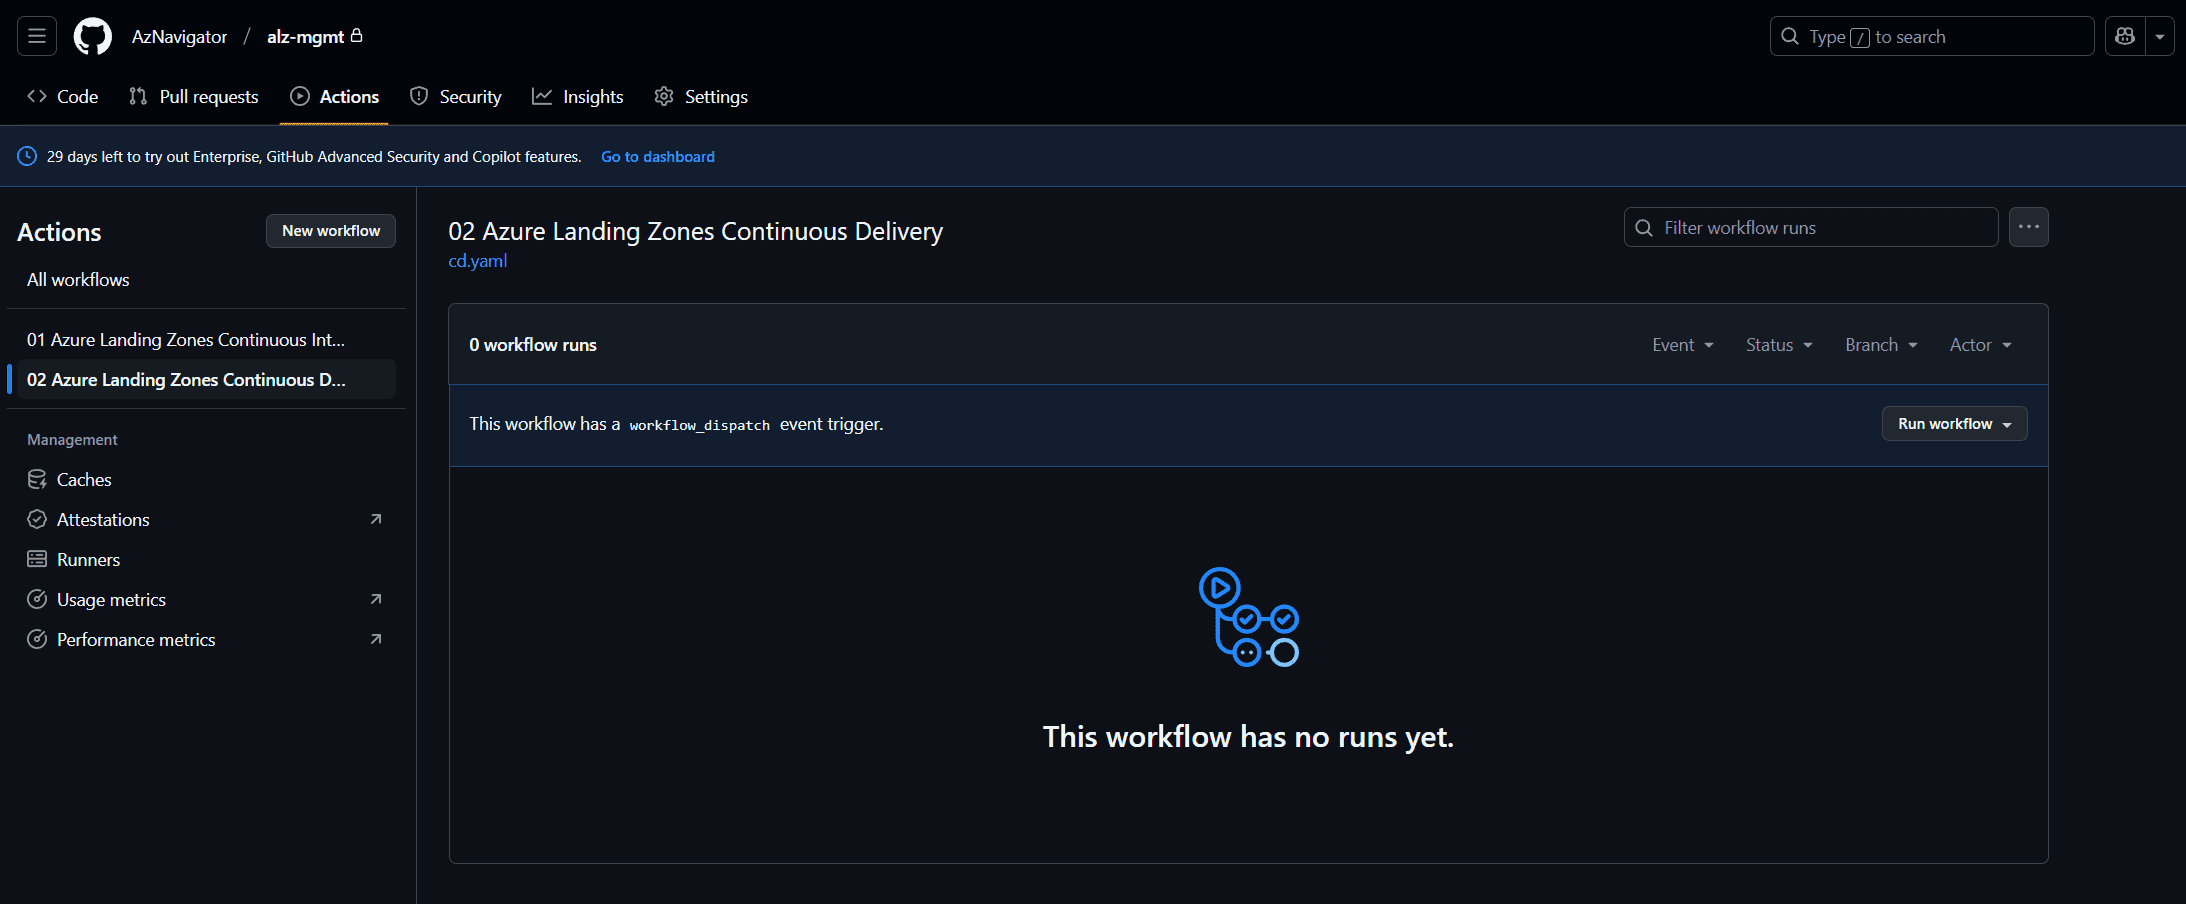
alz-mgmtrepository, go to the Actions tab. - You will see two workflows:
- 01 Azure Landing Zones Continuous Integration
- 02 Azure Landing Zones Continuous Delivery
- Within the
Workflow Explanation:
- 01 Azure Landing Zones Continuous Integration:
- This workflow is used to validate changes made to the
alz-mgmt-templatesrepository. - It ensures that the Bicep templates and configurations are syntactically correct and meet the required standards before deployment.
- This workflow is typically triggered when changes are pushed to the
alz-mgmt-templatesrepository.
- This workflow is used to validate changes made to the
- 02 Azure Landing Zones Continuous Delivery:
- This workflow is responsible for deploying the Azure Landing Zone environment.
- It uses the validated templates from the
alz-mgmt-templatesrepository to deploy resources to Azure. - This is the workflow you will run to deploy the landing zone environment.
- 01 Azure Landing Zones Continuous Integration:
Run the Workflow:
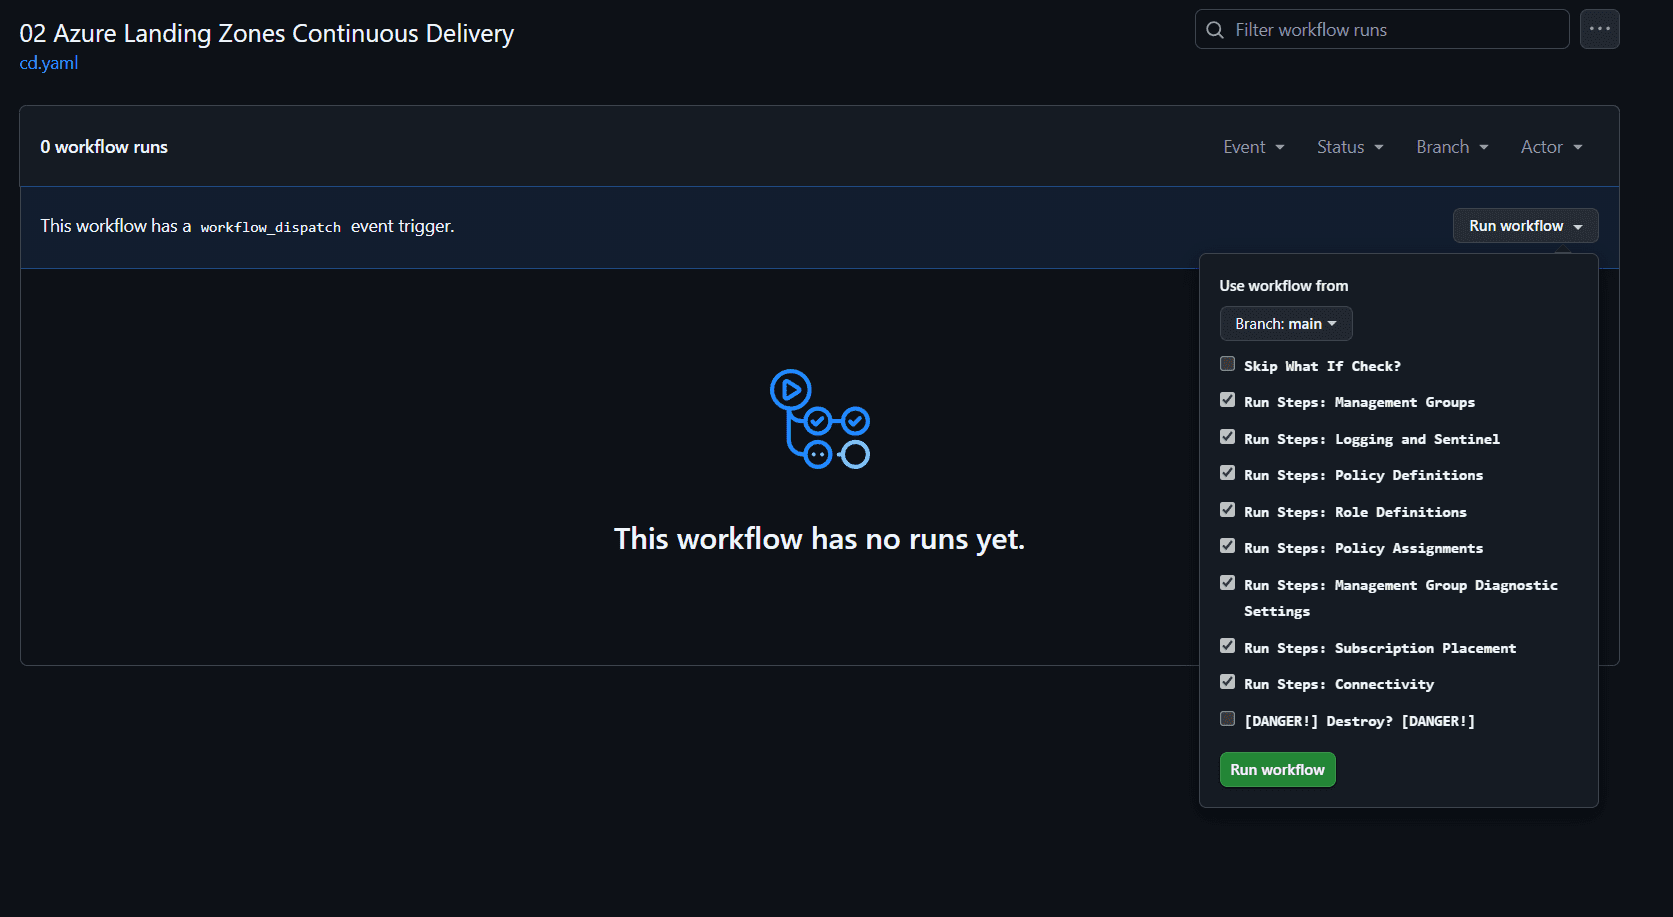
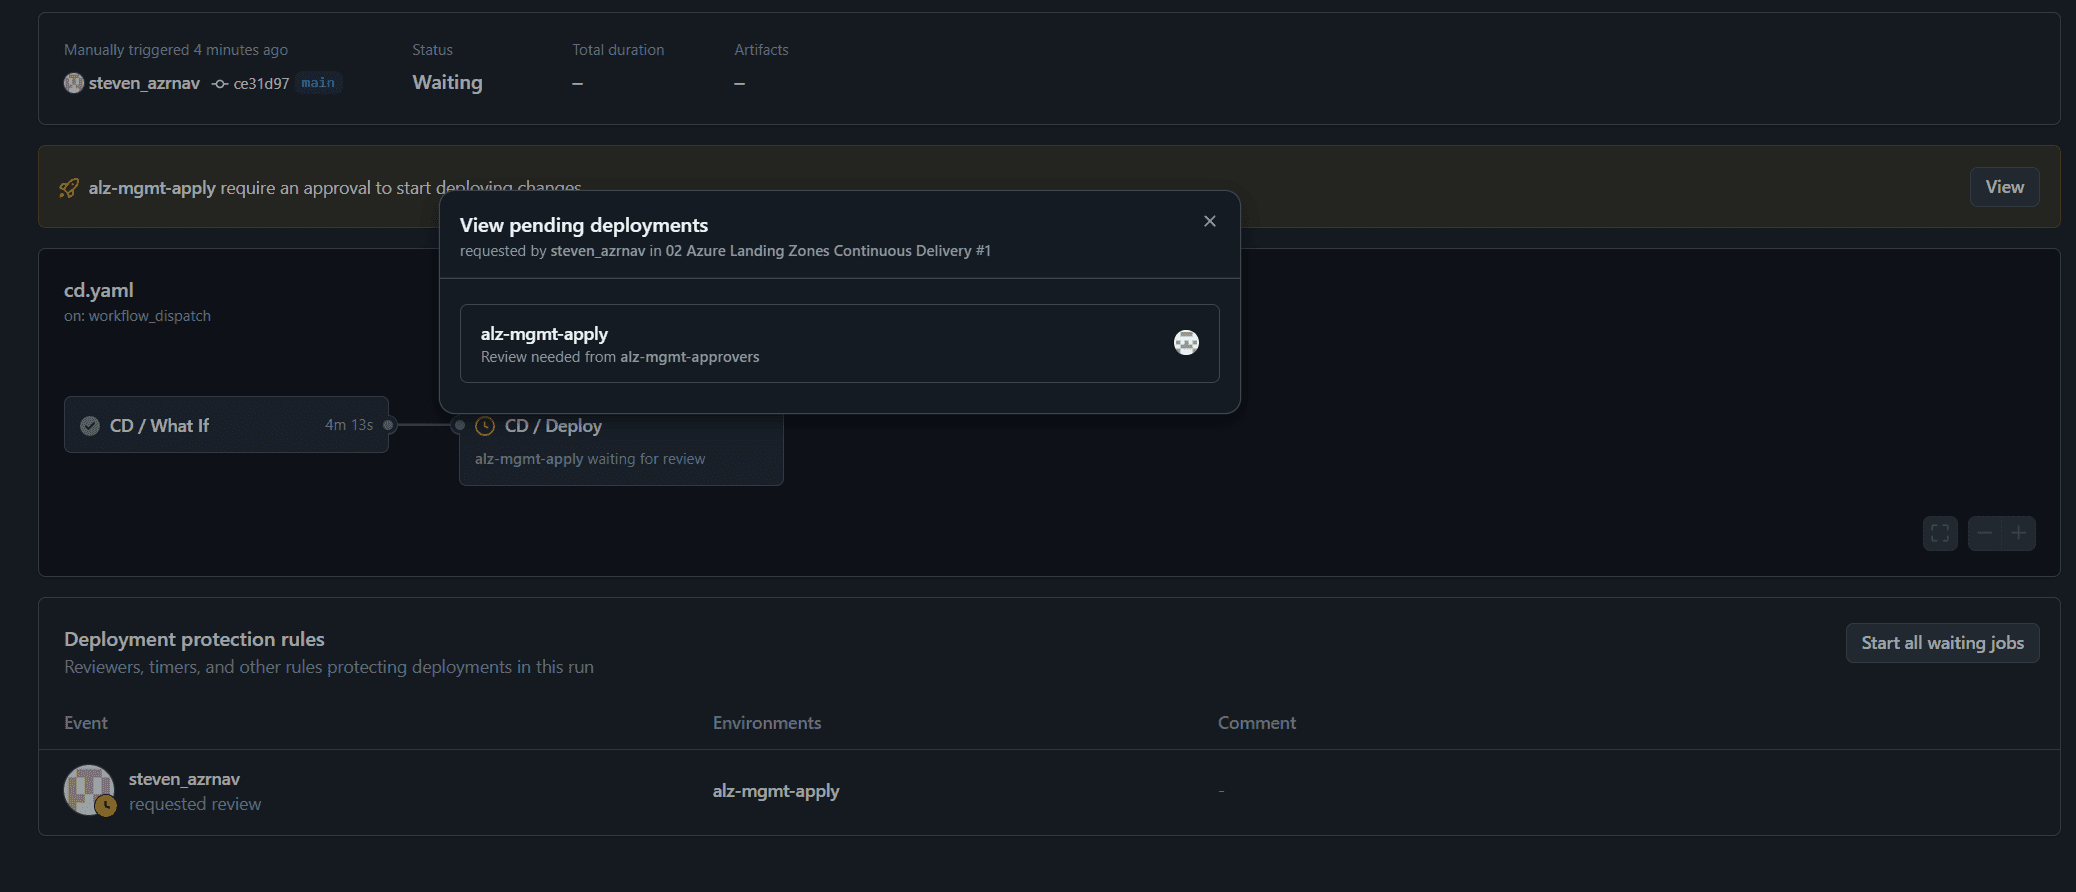
- Select the 02 Azure Landing Zones Continuous Delivery workflow.
- Click Run Workflow to start the deployment process.
- You must authorize the run or execute it with administrator privileges. This is required to ensure the workflow has the necessary permissions to deploy resources and interact with Azure.

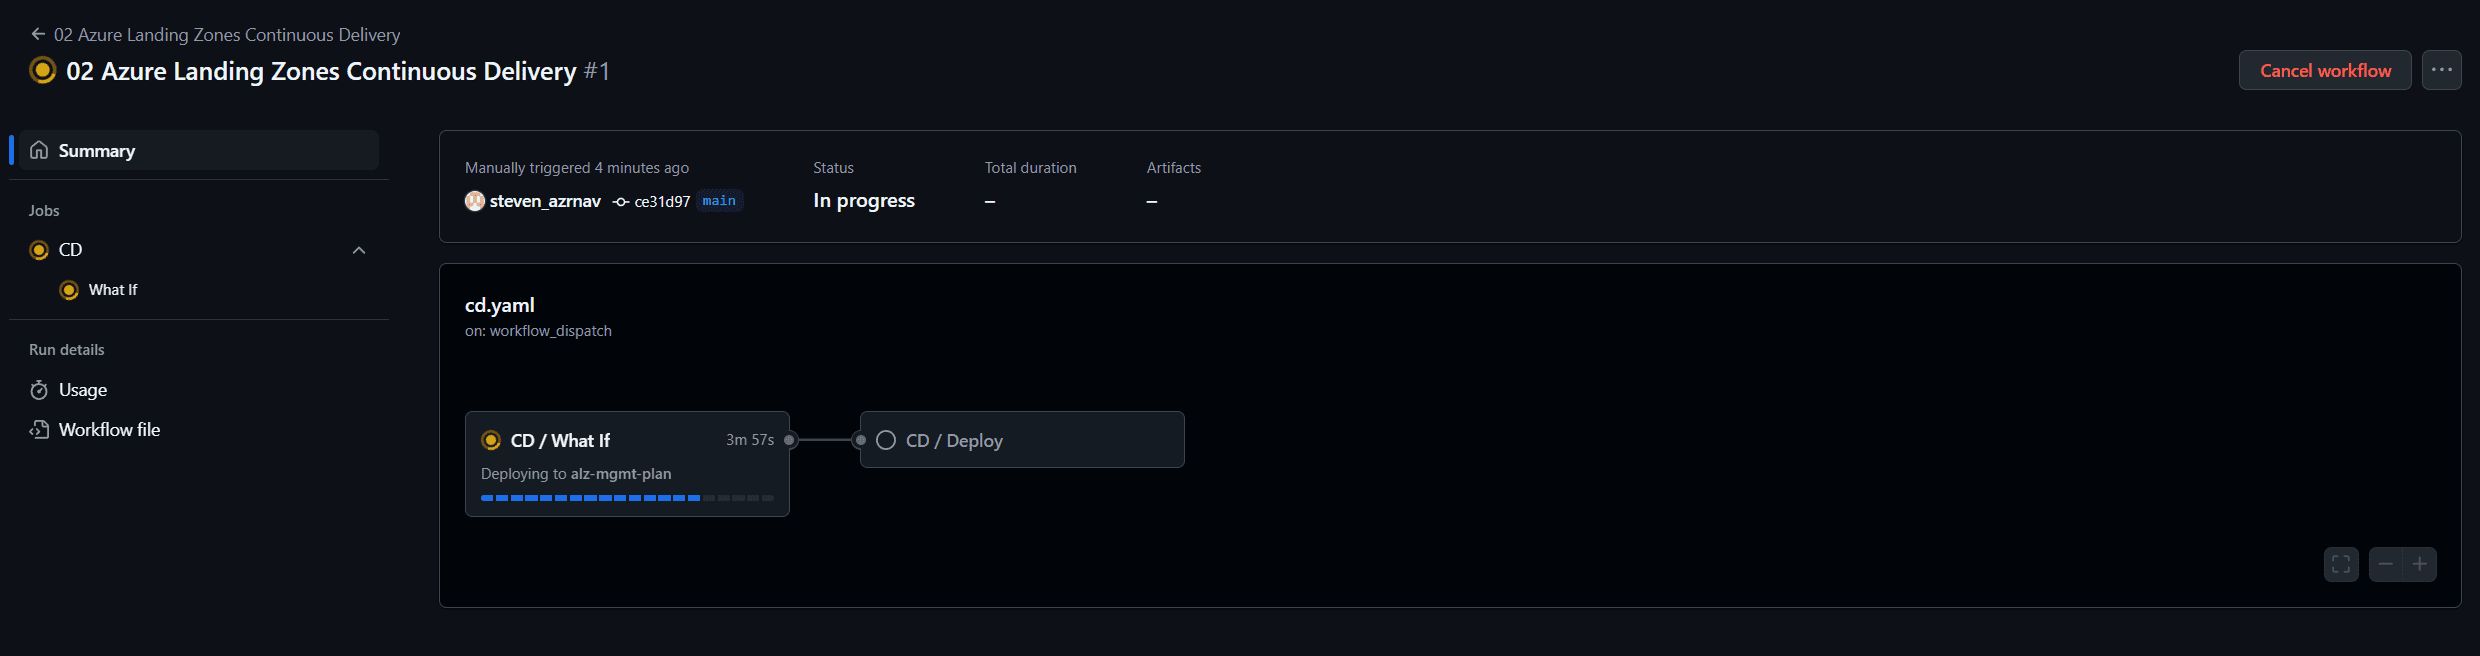
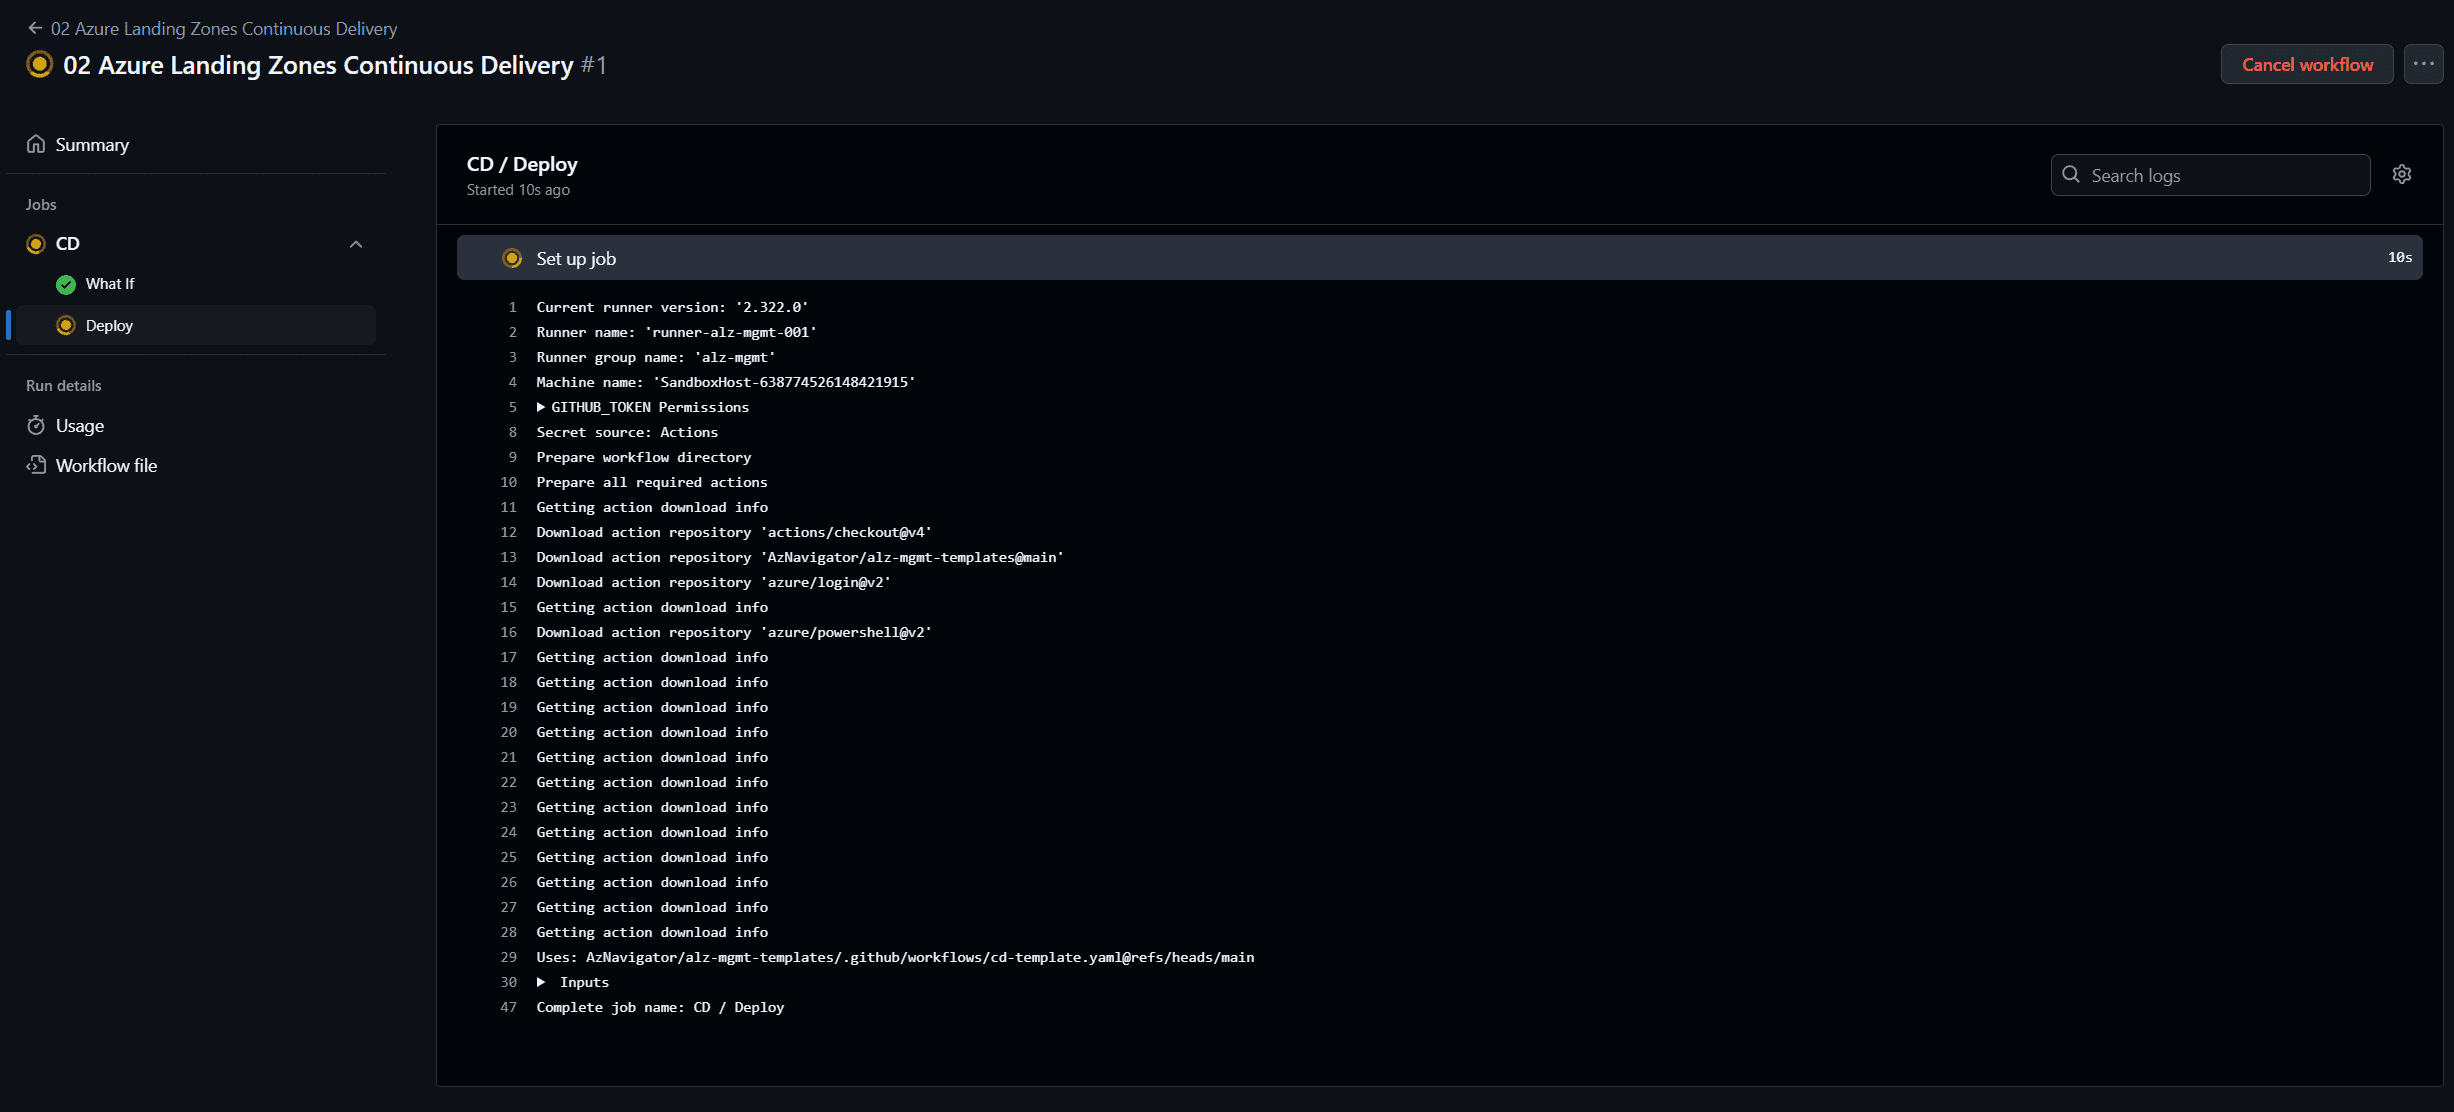
Step 3: Monitor the Deployment
Deployment Duration:
- The deployment process typically takes around 1 hour and 30 minutes to complete.
- Monitor the workflow logs in the GitHub Actions interface to track the progress of the deployment.
Self-Hosted Runners:
- The deployment will be executed by the two self-hosted runners created in the bootstrap subscription.
- These runners handle the execution of the workflows and ensure the deployment process is completed efficiently.
Step 4: Verify the Deployment
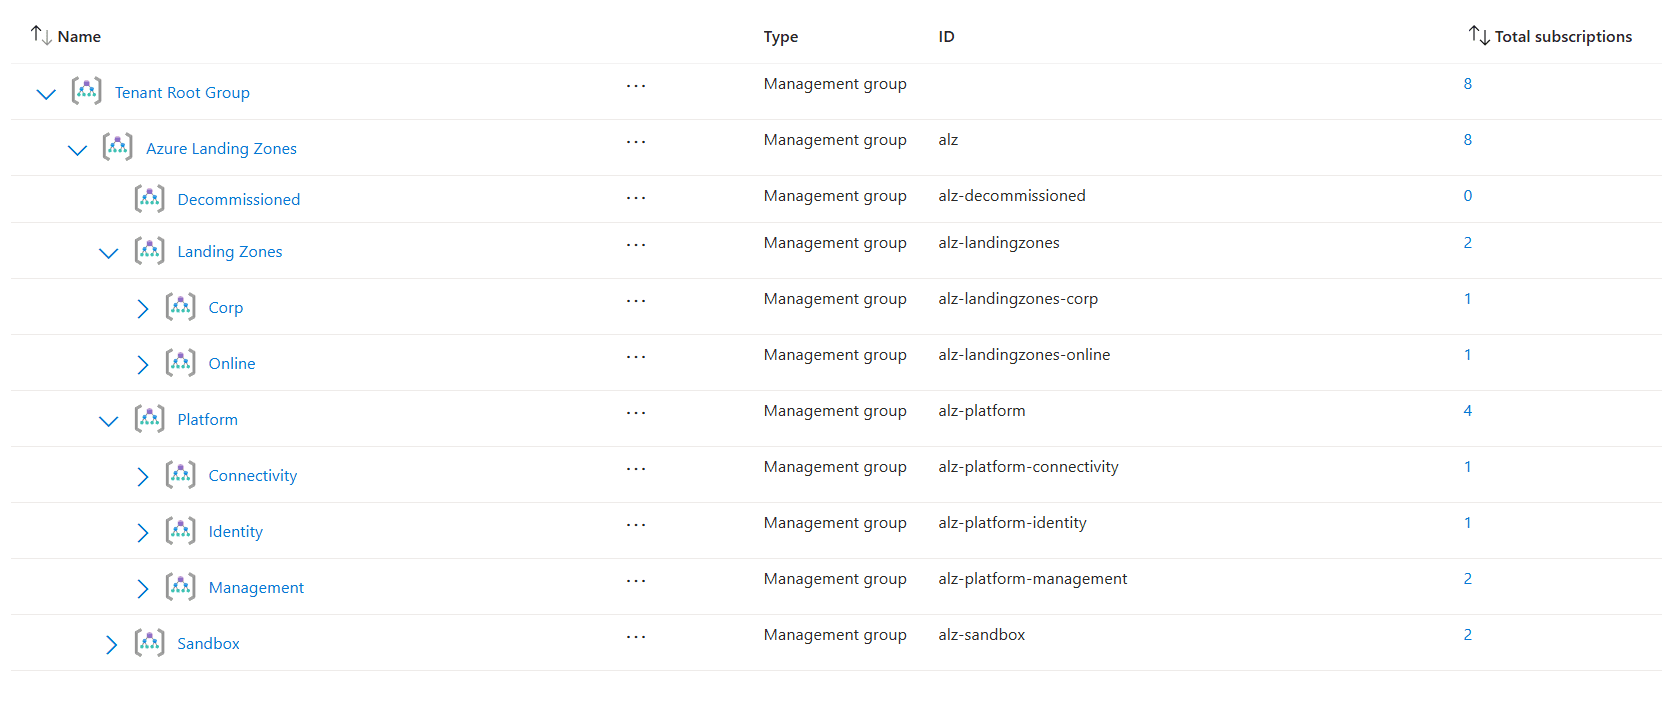
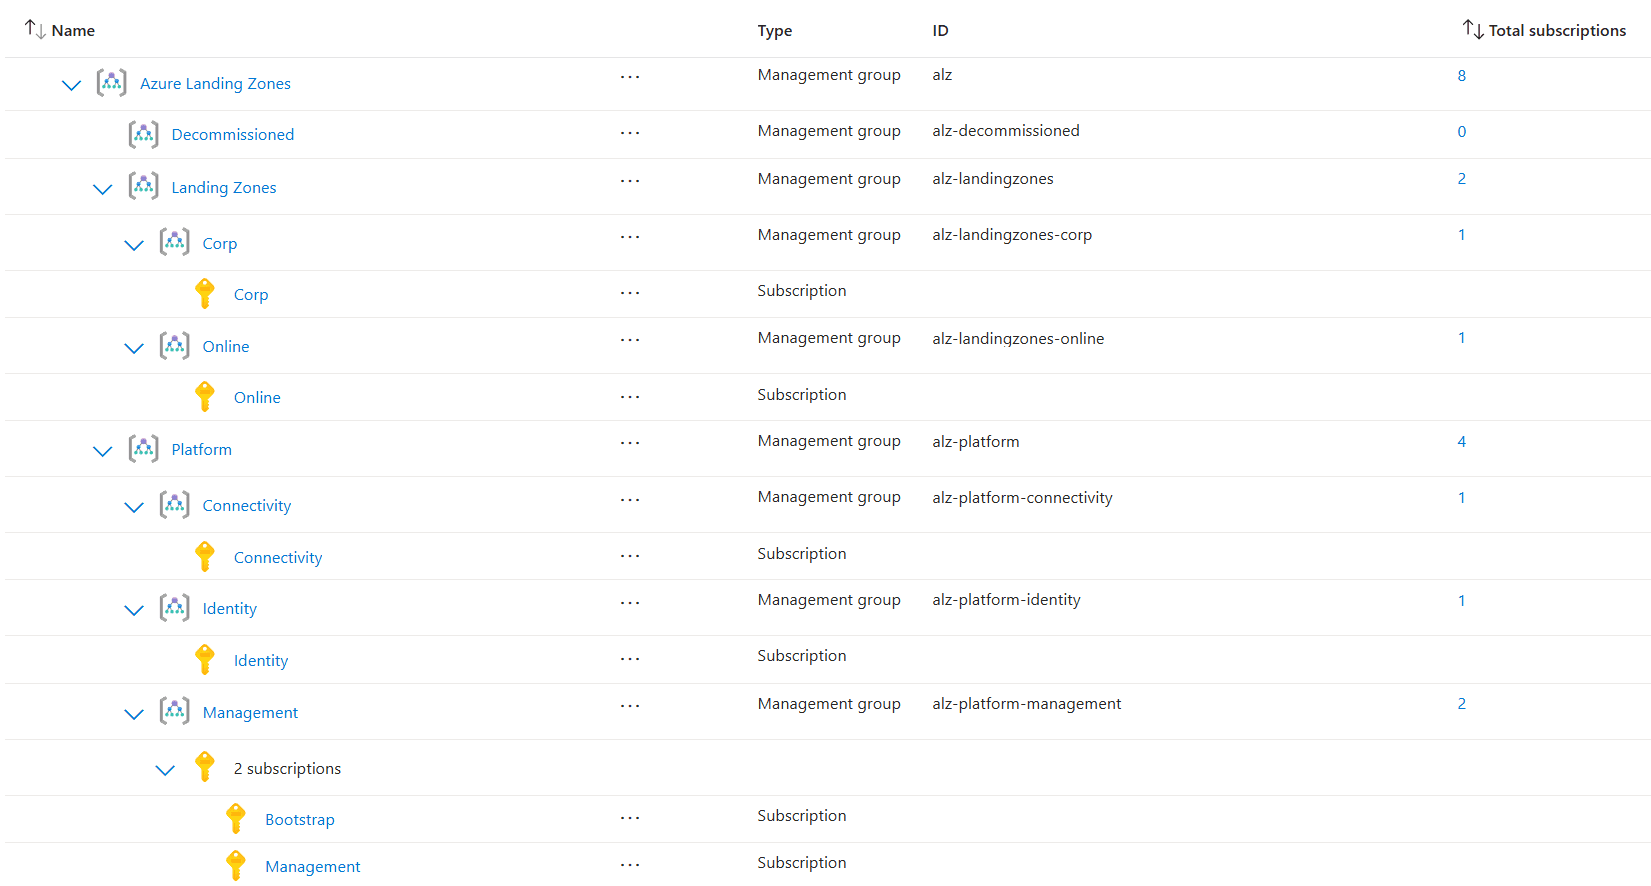
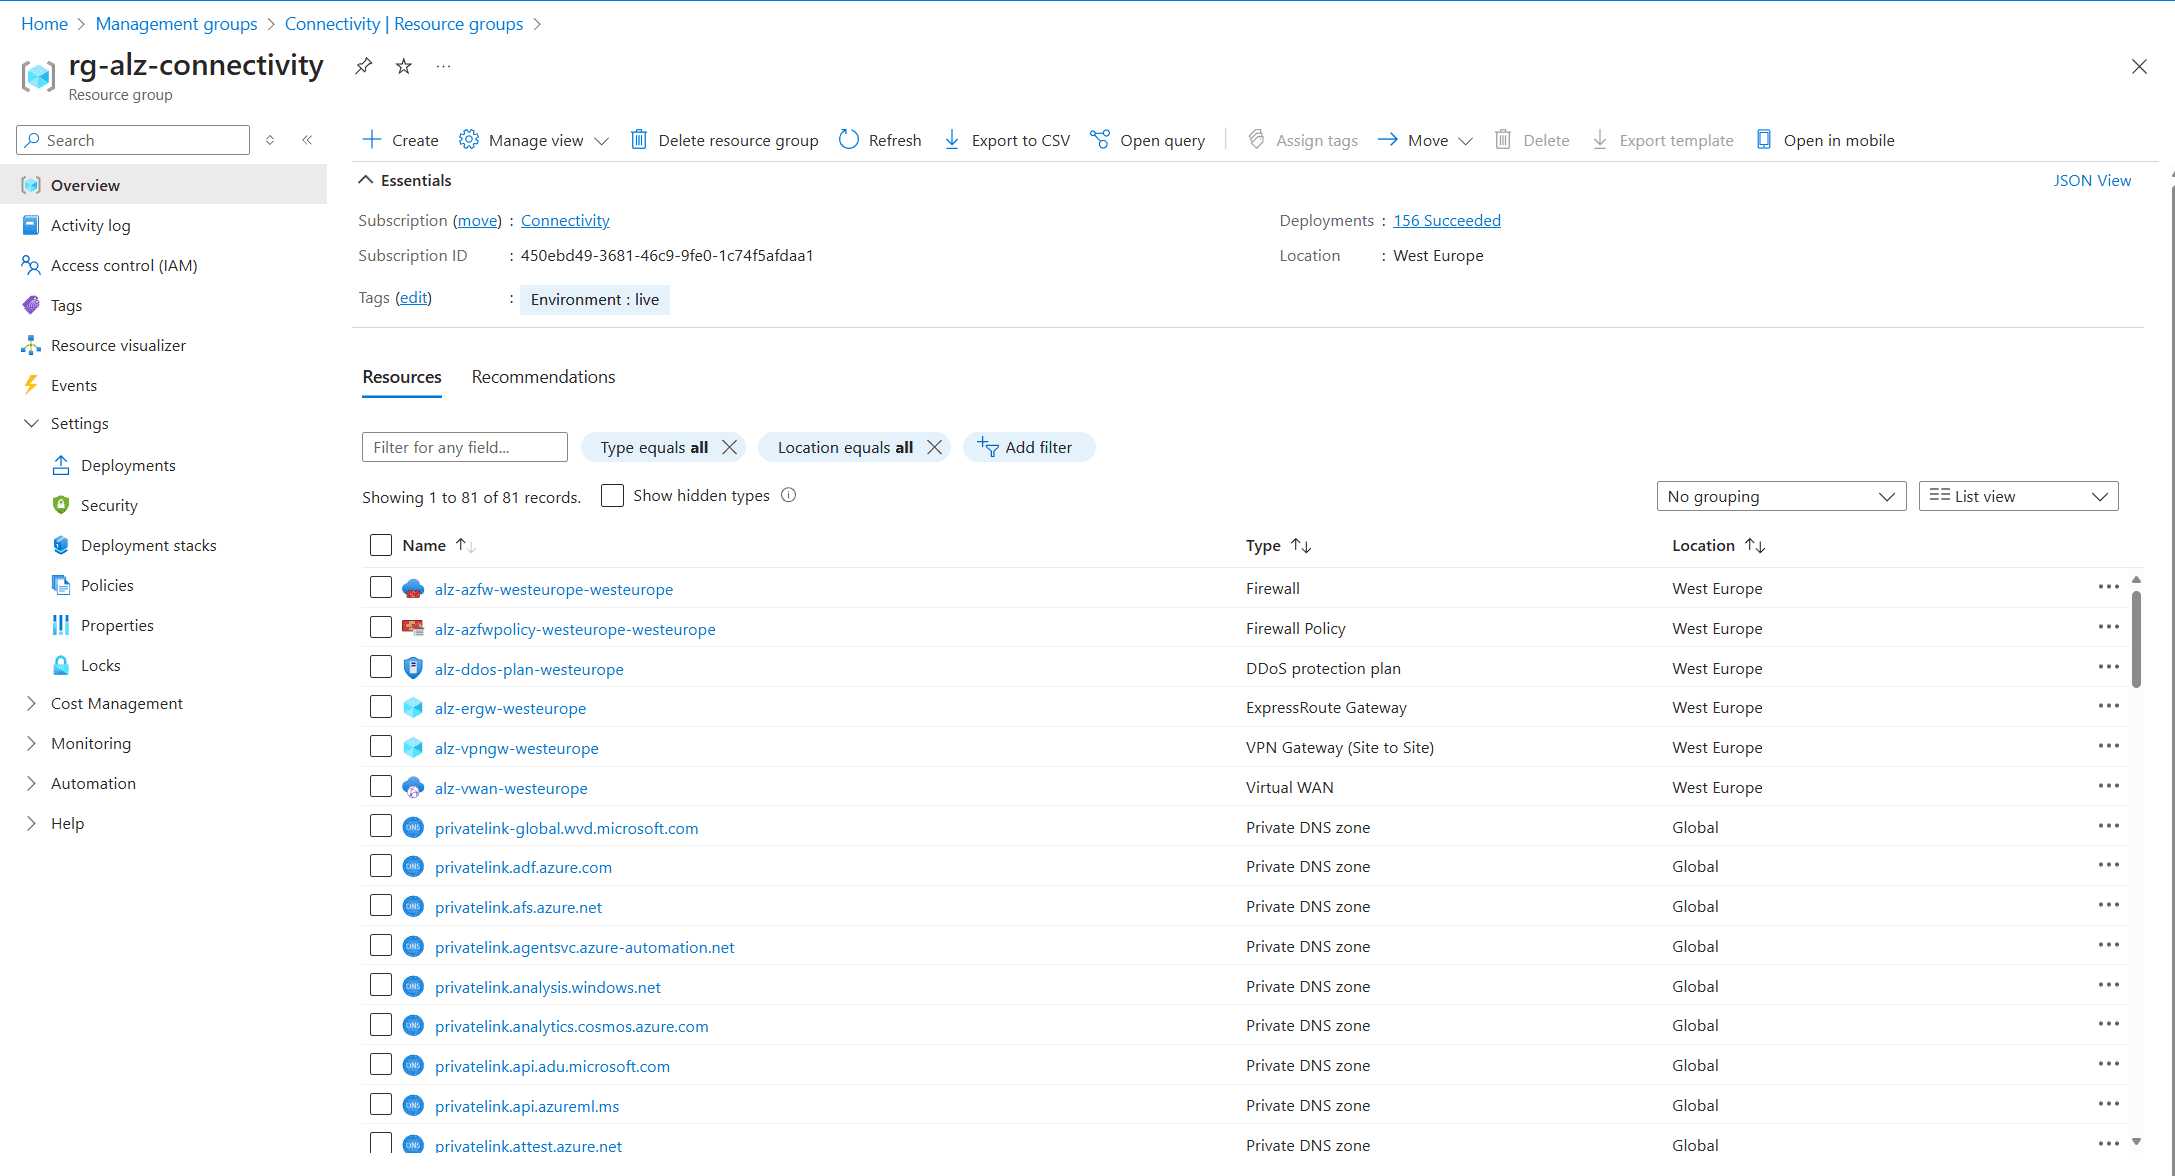
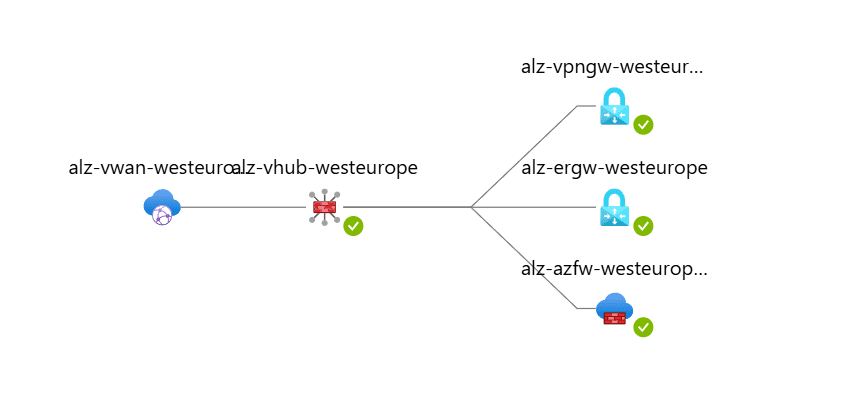
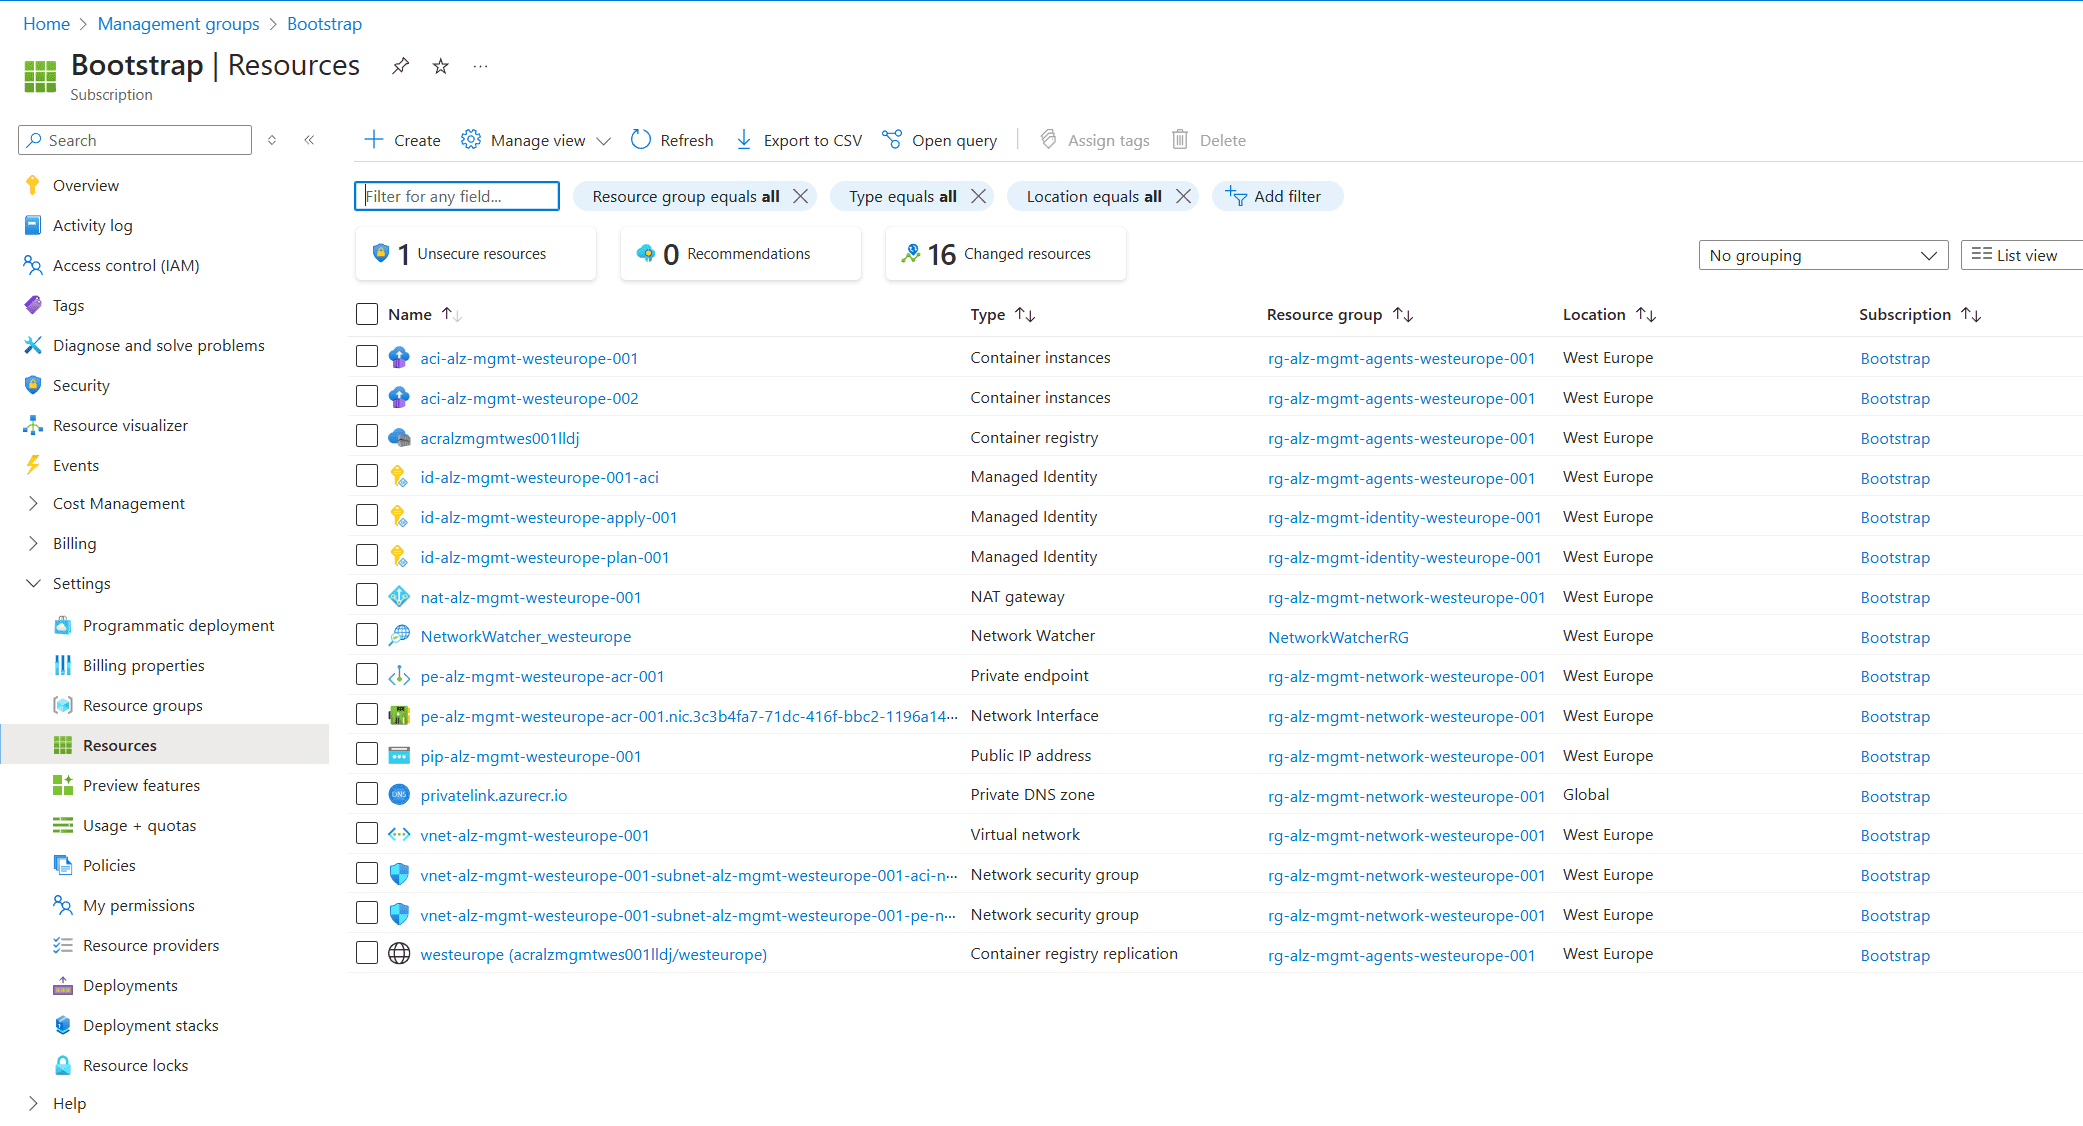
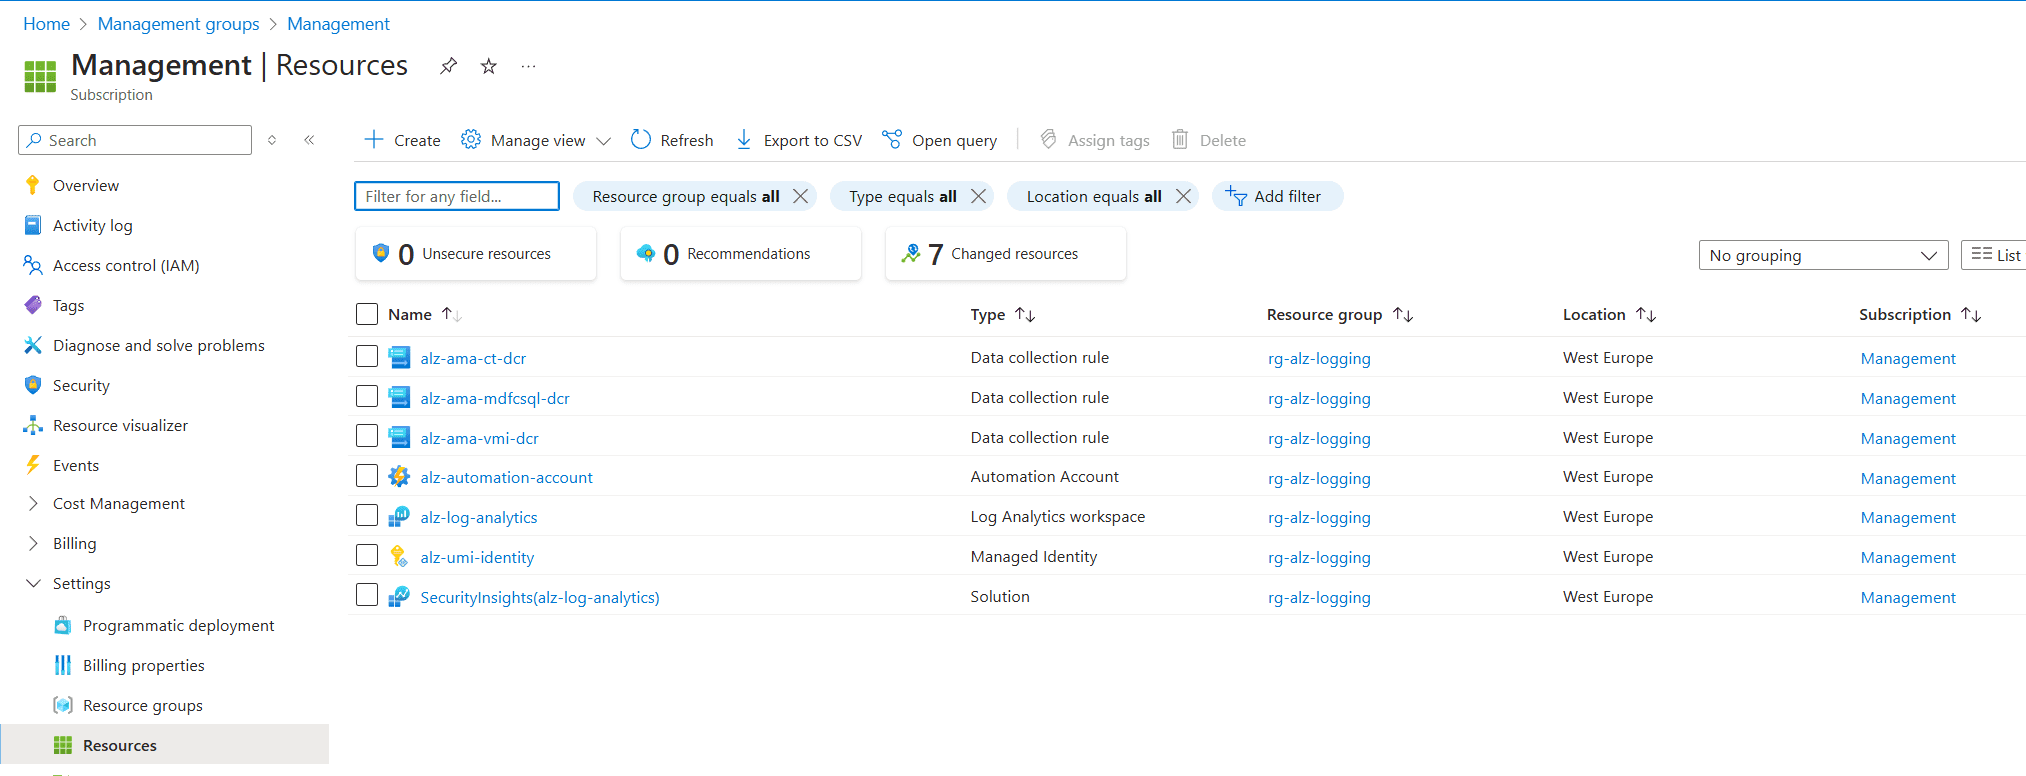
After the workflow completes successfully, the following components will be deployed:
Landing Zone Environment:
- A fully functional Azure Landing Zone environment, including a Virtual WAN (VWAN) hub.
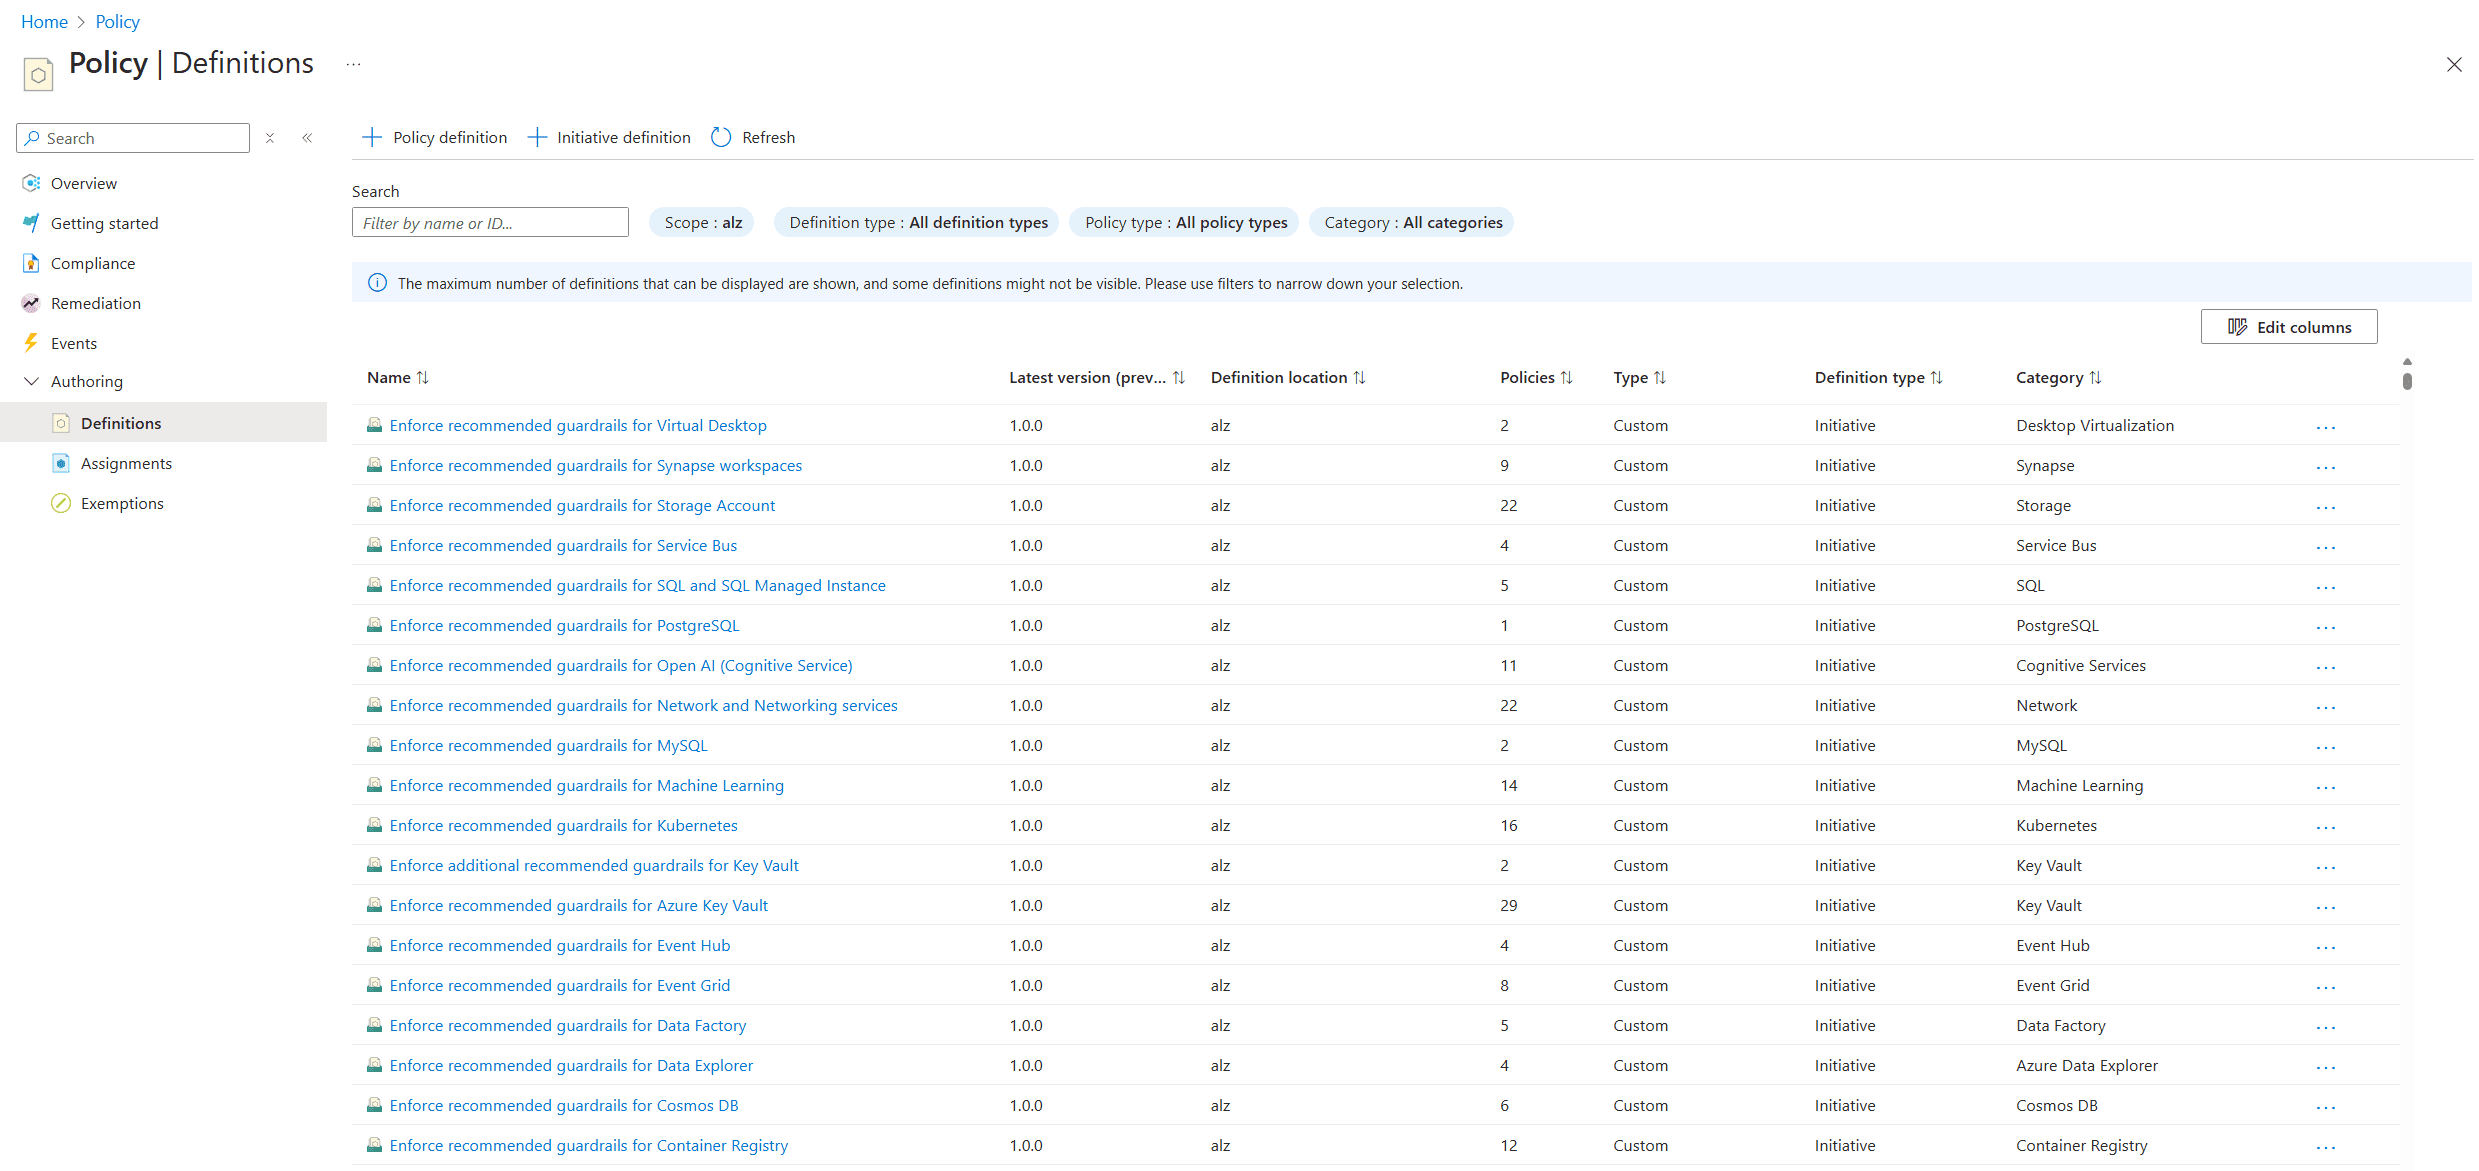
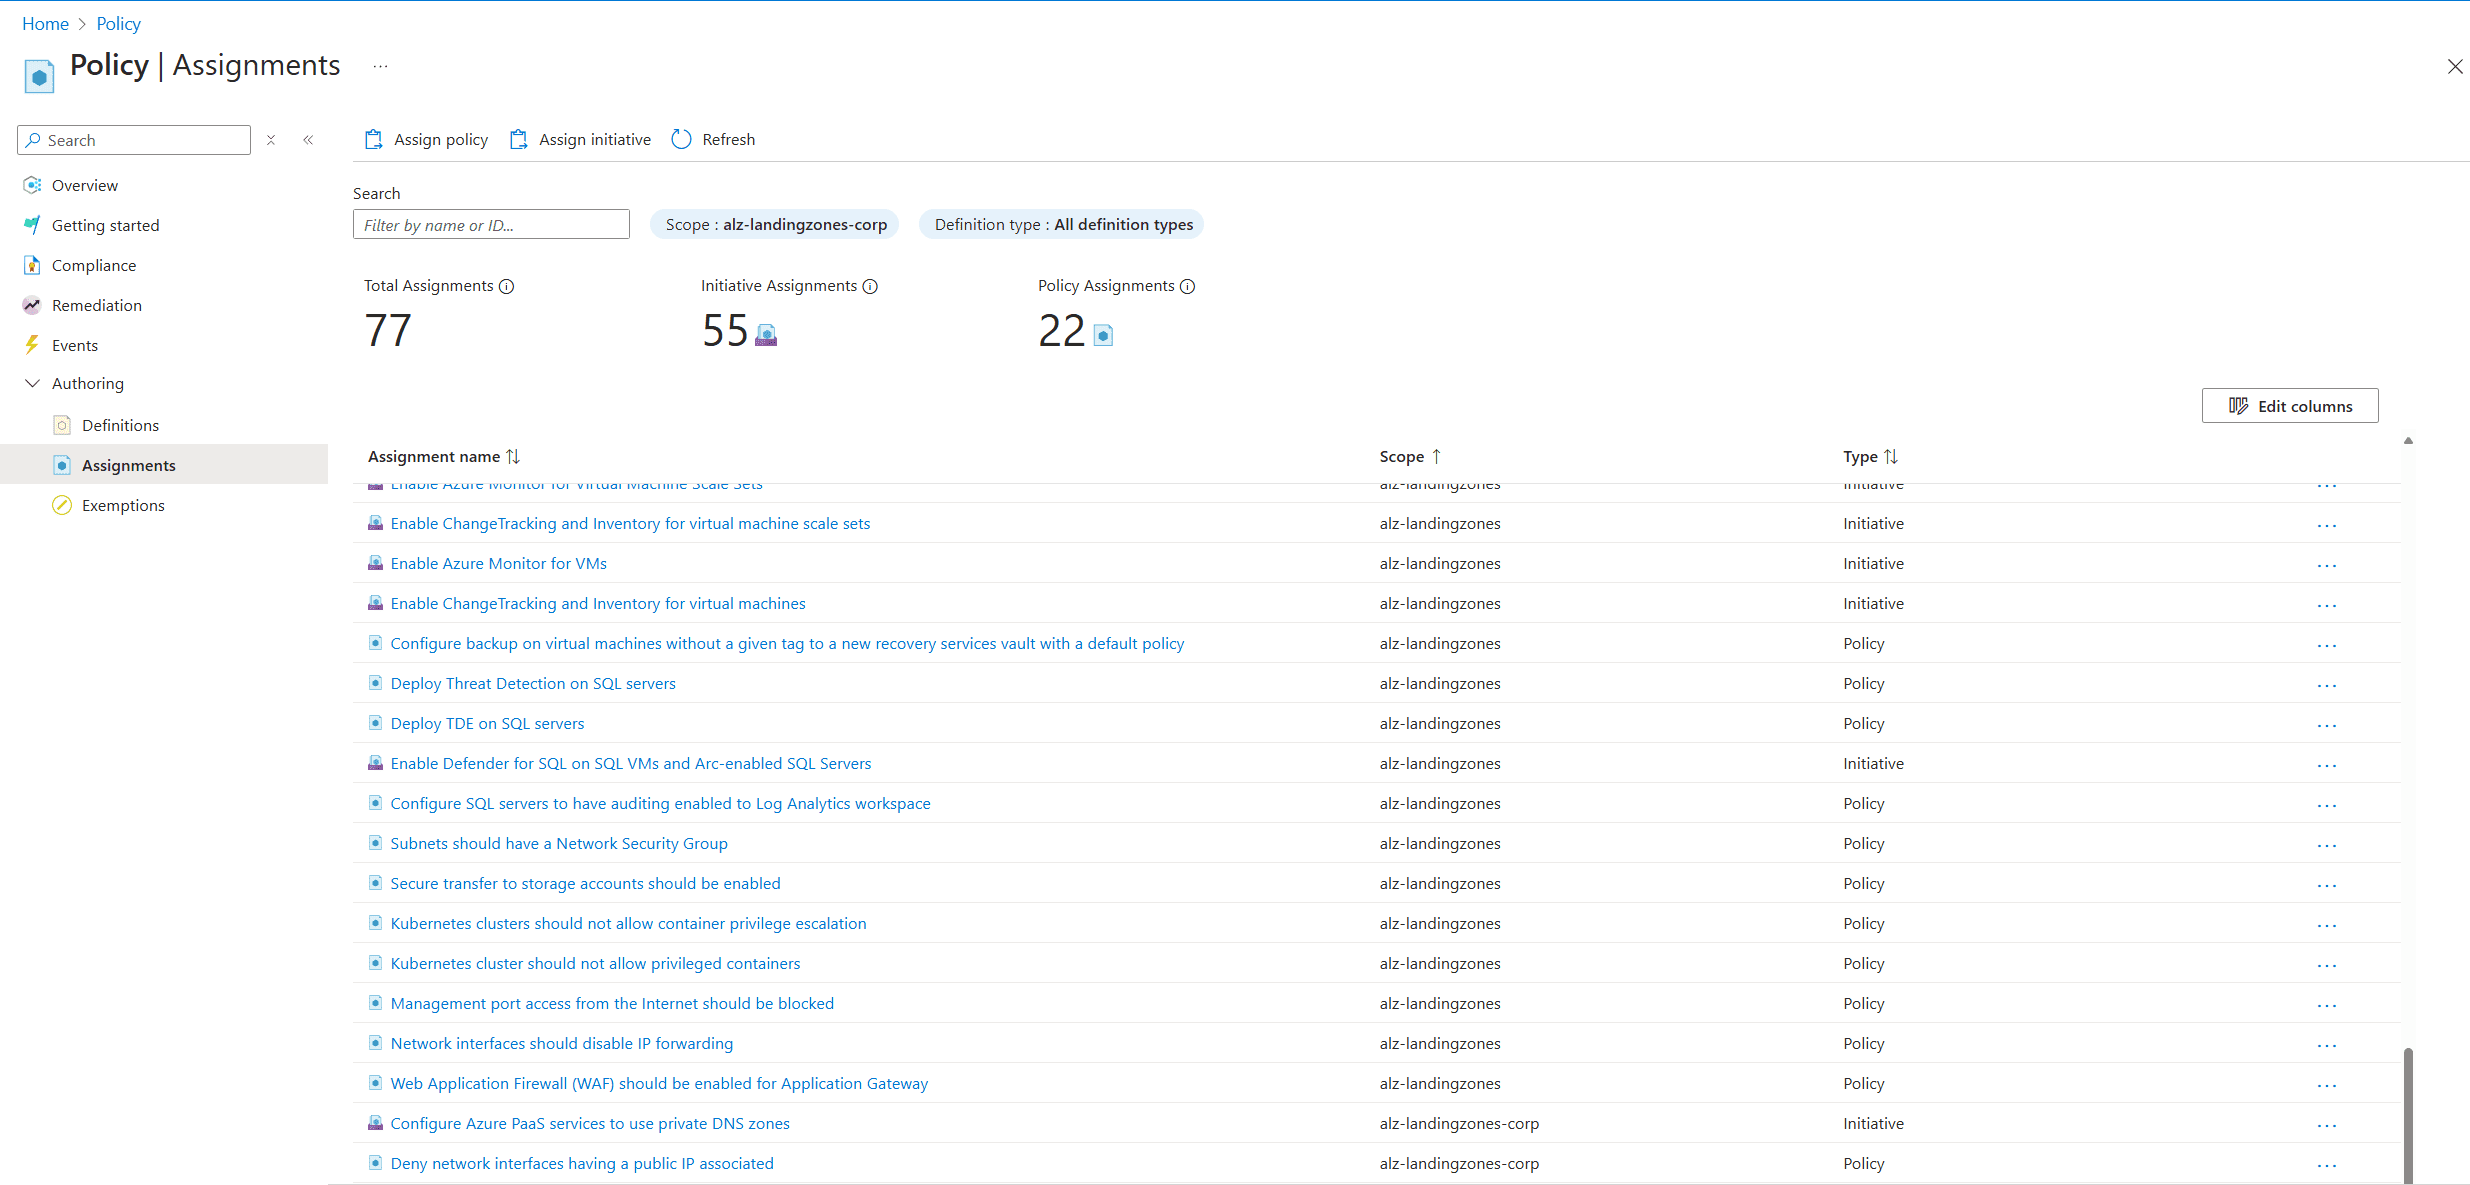
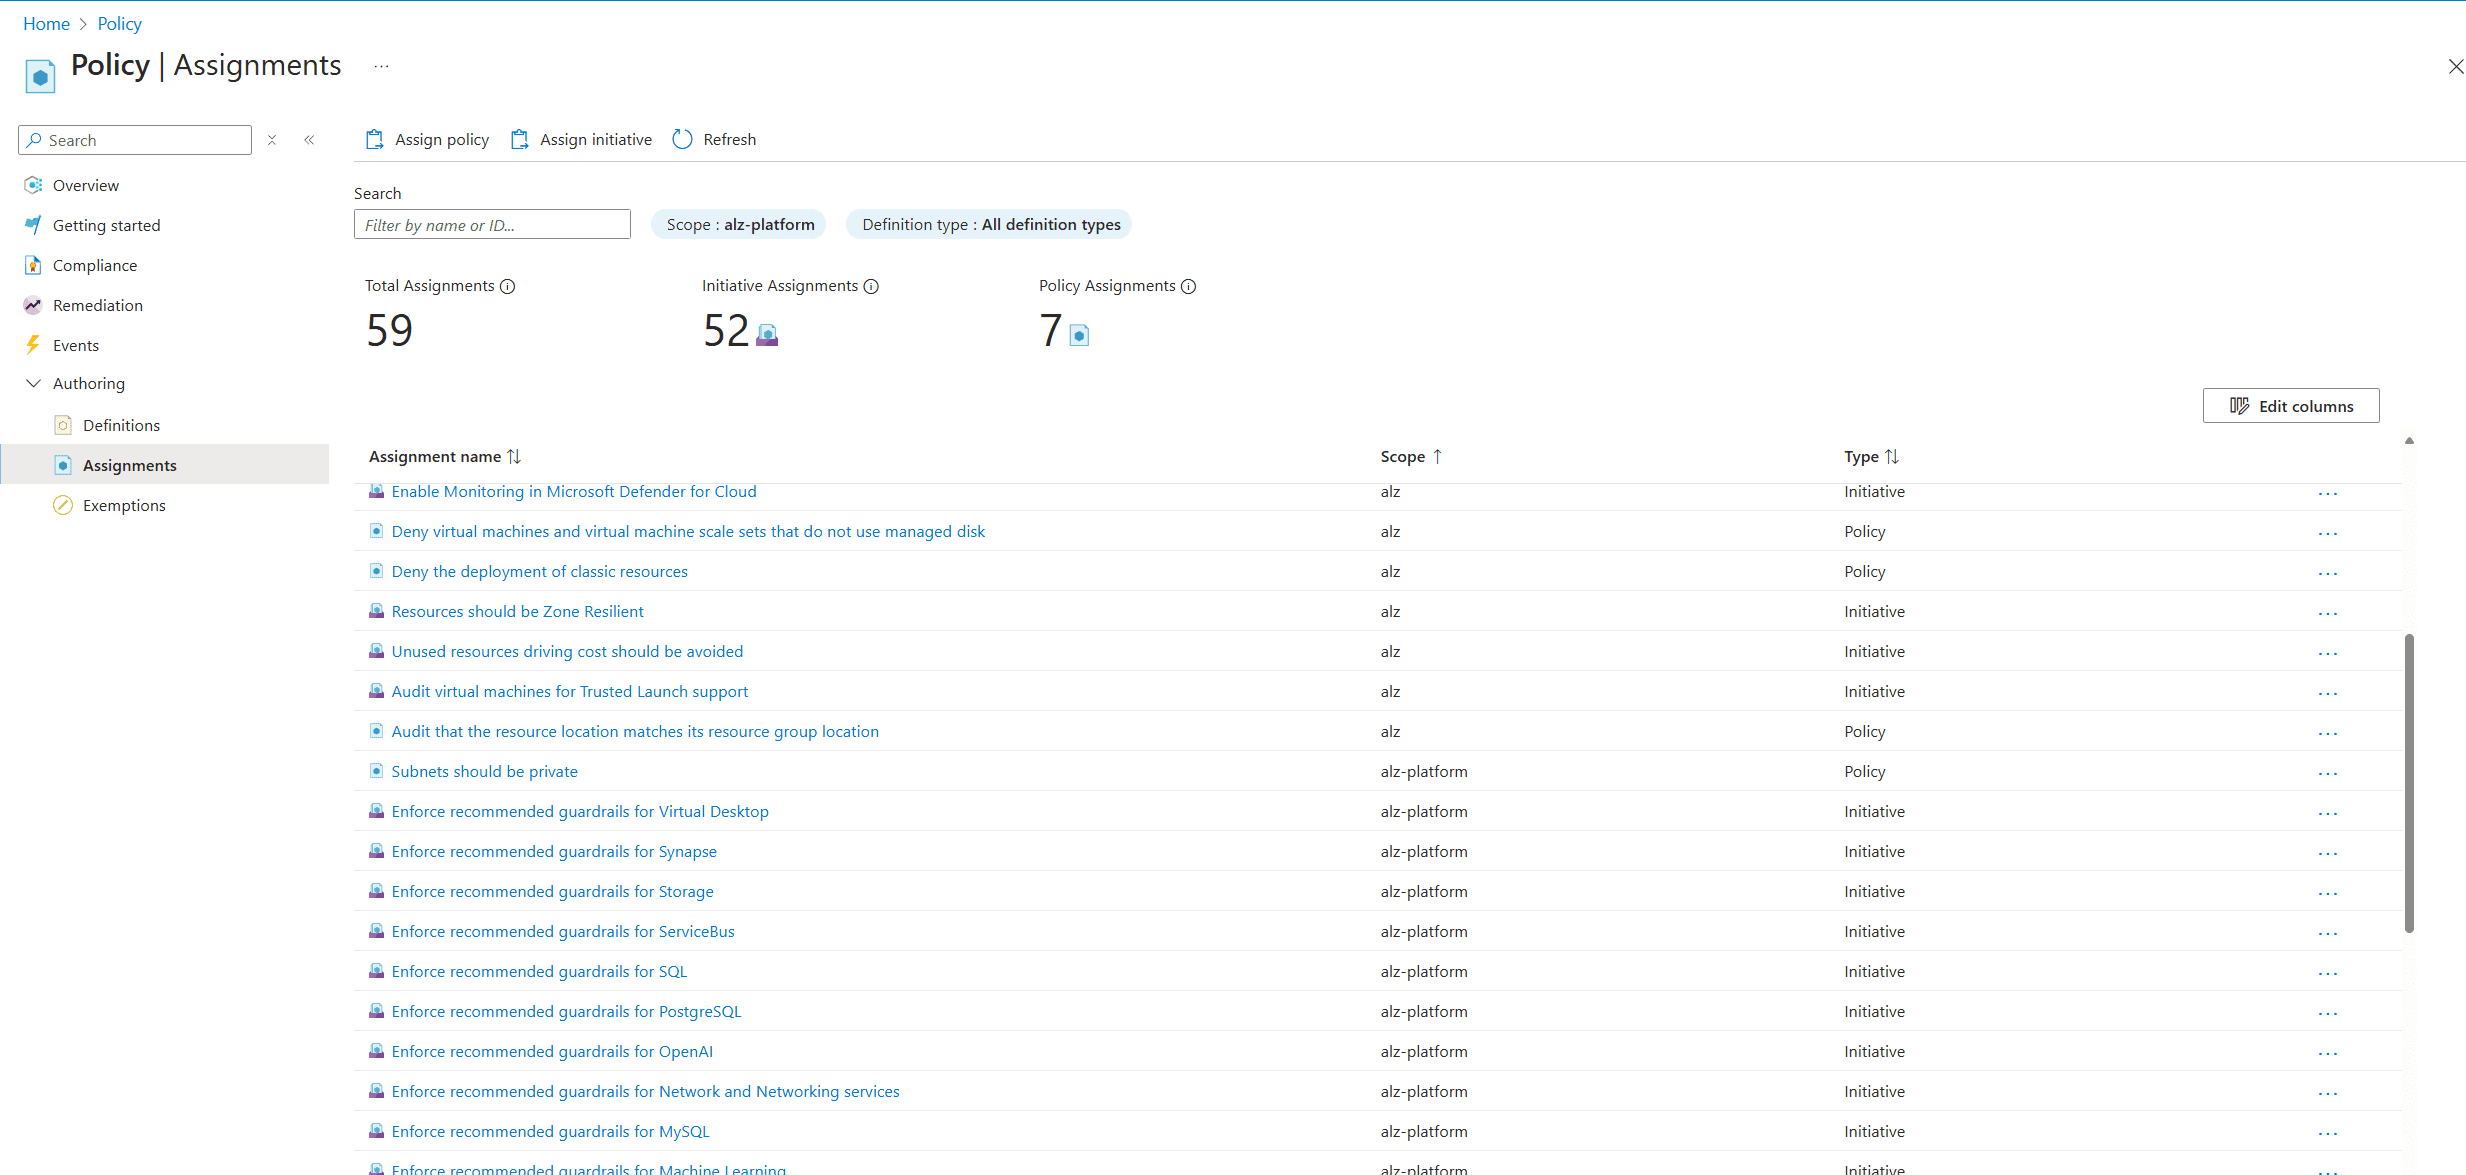
Policy Definitions:
- Policy definitions will be assigned to the relevant management groups to enforce or audit compliance across your enterprise.
Management Group Structure:
- Three or four subscriptions (management, identity, connectivity, and bootstrap) will be automatically moved into the appropriate management groups based on the configuration.
Custom RBAC Roles:
- Custom RBAC roles will be created and assigned to management groups to manage access and permissions across the environment.
Screenshots and Final Verification
In the following section, we provide screenshots of the final deployment, including:
- The management group structure.
- Infrastructure components such as the VWAN hub.
- Assigned policies and custom RBAC roles.
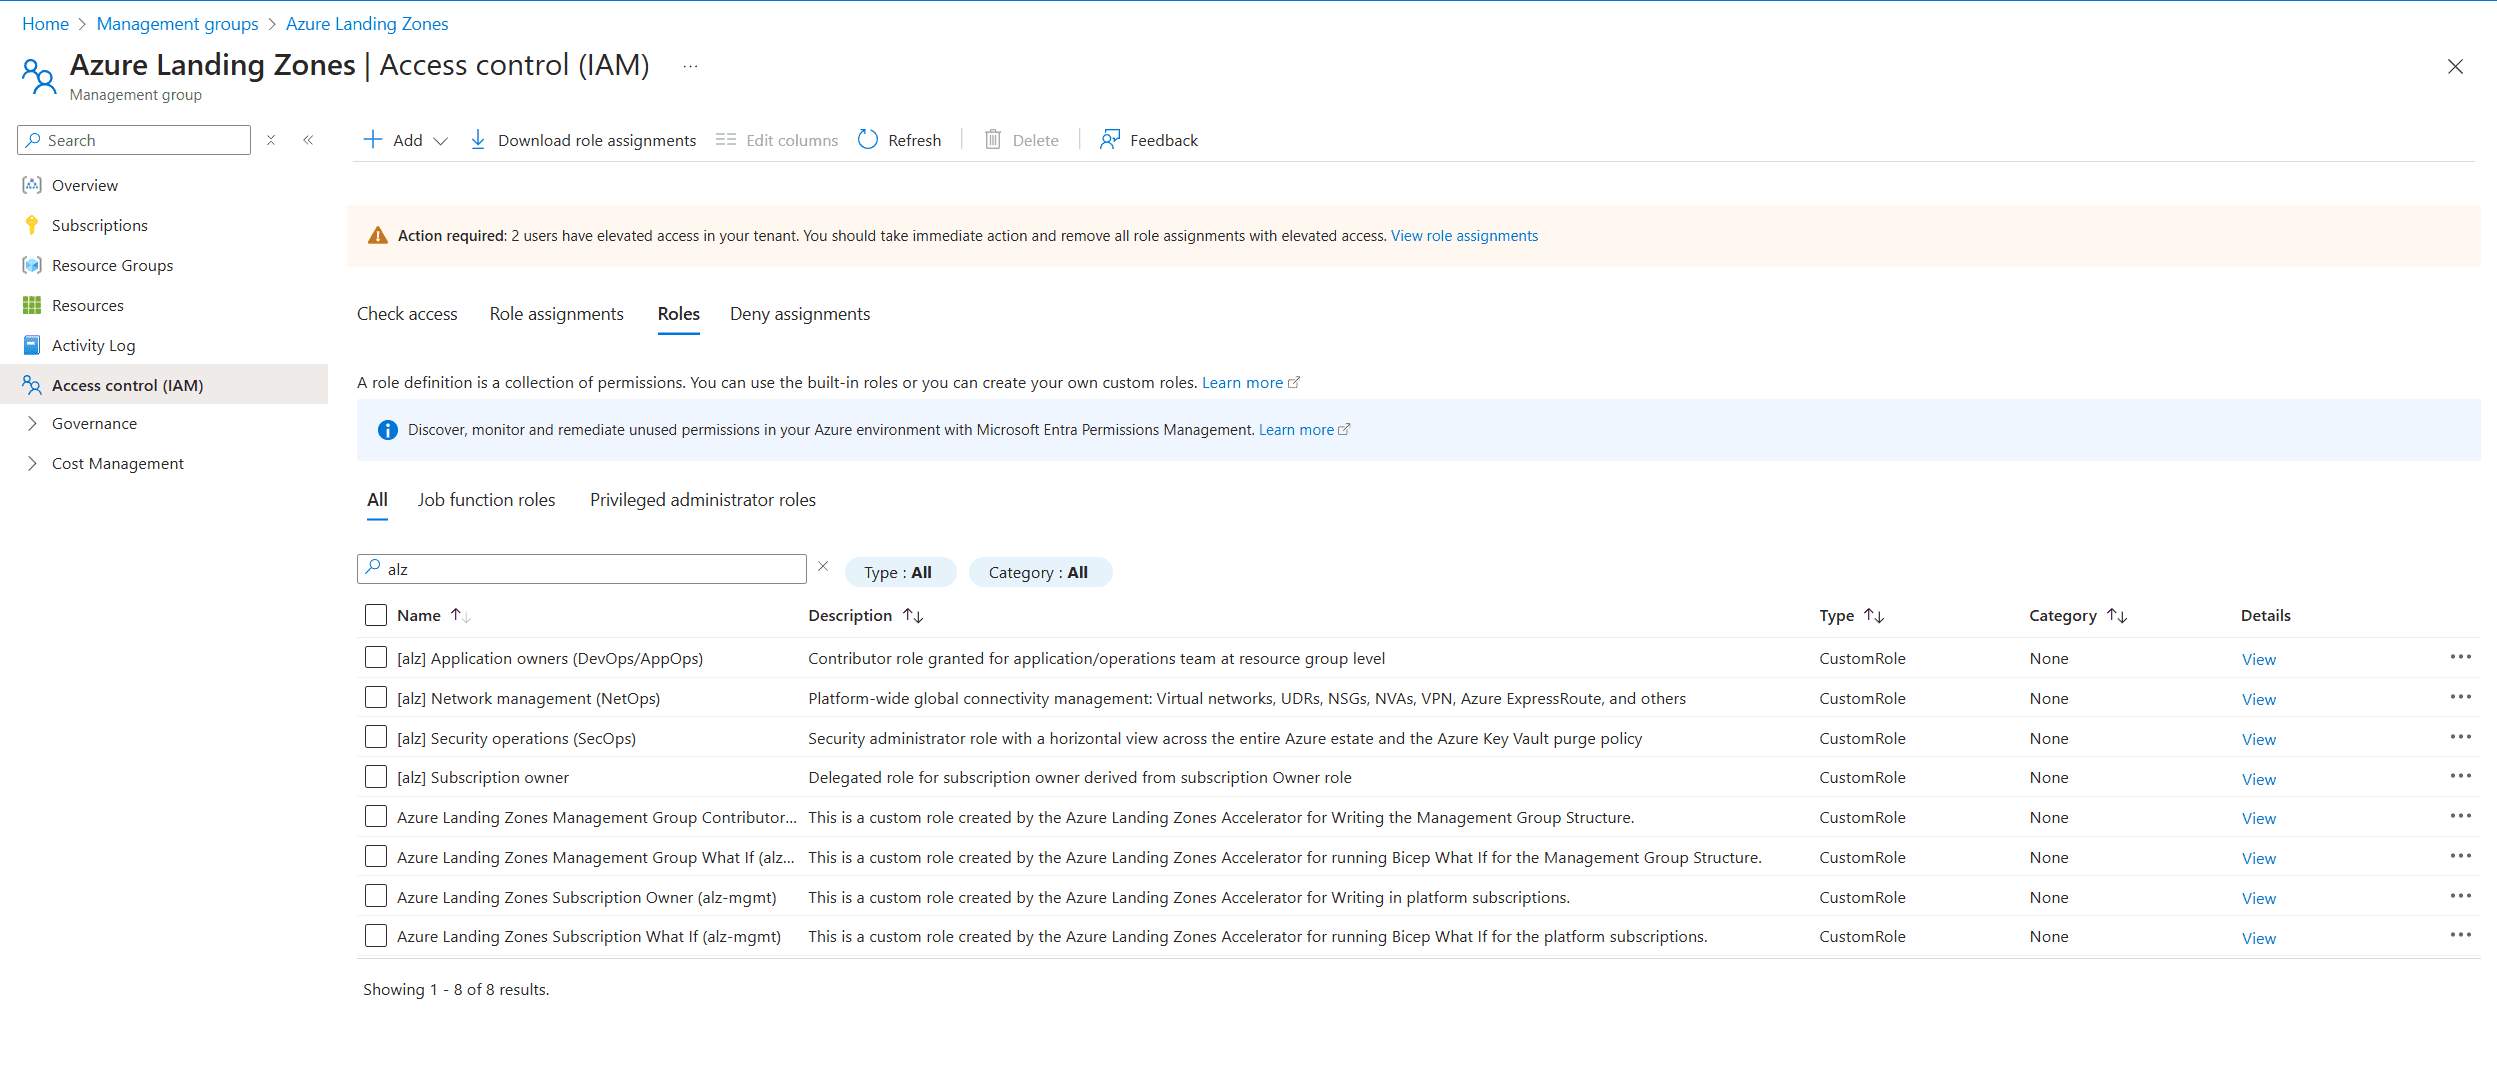
![Screenshot displaying the permissions for the Custom RBAC role [alz] Subscription owner. The image highlights the specific permissions assigned to this custom role, showcasing the detailed access controls and capabilities granted to the subscription owner within the Azure environment.](/wp-content/uploads/2025/03/Screenshot-2025-03-14-113653.png)
Conclusion
This case study has guided you through the process of deploying an Azure Landing Zone environment using GitHub Actions, Infrastructure as Code (IaC), and modern authentication methods like OpenID Connect (OIDC). By following the sequential steps outlined, you’ve successfully established a scalable, secure, and compliant cloud environment that aligns with Microsoft’s Cloud Adoption Framework best practices.
What We Did
Preparation and Prerequisites:
- We began by ensuring the environment was properly set up with the required tools, permissions, and subscriptions. This included installing PowerShell, Azure CLI, Git, and Visual Studio Code, as well as configuring administrative rights and Azure tenant access.
- We emphasized the importance of separating subscriptions for governance and bootstrap resources to ensure clarity and scalability.
Setting Up GitHub Enterprise:
- We created a new GitHub Enterprise account with managed users, configured SCIM provisioning, and enabled single sign-on (SSO) for secure authentication.
- We established an organization within the enterprise to serve as a logical container for repositories and workflows, ensuring a structured approach to managing resources.
Bootstrapping the Deployment:
- We created two repositories:
alz-mgmtfor managing workflows andalz-mgmt-templatesfor storing reusable templates. - Using a YAML file, we defined the inputs required for the deployment and triggered the bootstrap process to set up foundational resources, including self-hosted runners.
- We created two repositories:
Deploying Resources via GitHub Actions:
- We ran the “Azure Landing Zones Continuous Delivery” workflow in the
alz-mgmtrepository to deploy the Azure Landing Zone environment. - This workflow leveraged the validated templates from
alz-mgmt-templatesto deploy resources such as the Virtual WAN hub, policy definitions, and management group hierarchy. - The deployment was executed by self-hosted runners, ensuring compatibility with the GitHub Enterprise trial license.
- We ran the “Azure Landing Zones Continuous Delivery” workflow in the
Purpose and Outcome
The primary purpose of this deployment was to establish a robust Azure Landing Zone environment that serves as the foundation for cloud adoption. By leveraging IaC and GitHub Actions, we achieved the following outcomes:
- Scalability: The landing zone environment is designed to scale with your organization’s needs, supporting future workloads and expansions.
- Security and Compliance: Policy definitions and management group structures enforce governance and audit compliance across your enterprise.
- Automation: The use of GitHub Actions and IaC ensures consistent and repeatable deployments, reducing manual effort and minimizing errors.
- Integration: By using OIDC and managed users, we established a secure and seamless authentication mechanism for the enterprise environment.
Benefits
- Efficiency: The automated workflows streamline the deployment process, saving time and effort compared to manual methods.
- Consistency: IaC ensures that resources are deployed in a predictable and standardized manner, reducing variability and human error.
- Governance: The assigned policies and management group hierarchy provide a structured approach to managing resources and enforcing compliance.
- Flexibility: The modular design of the repositories (
alz-mgmtandalz-mgmt-templates) allows for easy customization and reuse across different projects.
Next Steps
Deploying the landing zone is typically the starting point for most enterprises, as many already have an existing brownfield environment. The next steps involve:
Moving Subscriptions:
- Move existing subscriptions into the desired management group structure.
- Conflicts with assigned policies will not prevent the move or shut down existing services. However, depending on the policy effect (e.g. deny) the deployment of non-compliant resources will fail in the future.
Remediating Existing Resources:
- To bring existing resources into compliance, you will need to manually trigger remediation tasks.
- This ensures that existing resources align with the policies and governance structure of the landing zone.
Closing Words
By completing this deployment, you’ve established a secure and scalable foundation for managing your Azure environment. This landing zone environment is designed to support your organization’s cloud adoption journey, enabling you to deploy workloads efficiently while maintaining governance and compliance. As you move forward, you can build upon this foundation to integrate existing resources, optimize operations, and scale your cloud infrastructure to meet evolving business needs.
Congratulations on successfully deploying your Azure Landing Zone environment!